Field Operations Guide for Safety/Service Patrols – Checklists and Visor Cards
Checklists
| Initial Action Items: Within 15 Minutes | |
|---|---|
 |
Estimate magnitude / expected duration of incident. |
 |
Estimate vehicle queue (backup) length. |
 |
Identify the need for and request secondary response agencies. |
 |
Make appropriate notifications. |
 |
Set-up appropriate TTC components based on estimates. Upgrade TTC every 15 minutes. |
 |
Set initial taper in direction of traffic travel. |
 |
Report to the incident Command / Unified Command Post. |
 |
Remove taper in opposite direction of traffic travel. |
Vehicle Positioning Checklist
| Vehicle Positioning | |
|---|---|
 |
Limit number of responding vehicles. |
 |
Stage unnecessary vehicles off roadway. |
 |
Park all vehicles on same side of roadway. |
 |
Position apparatus to protect responders. |
 |
Minimize emergency lighting. |
 |
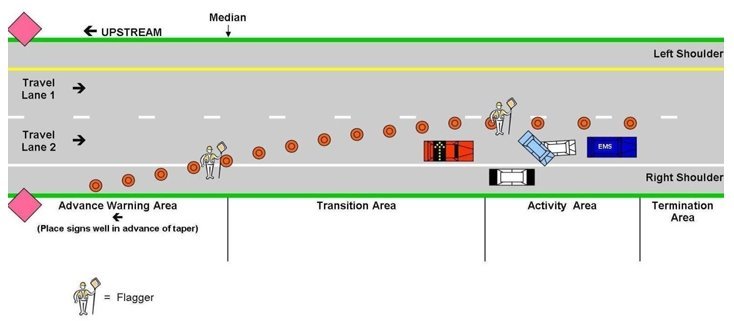
Set traffic cones for transition and activity area. |
 |
Set out cone taper in the direction of travel. |
 |
Create a large enough activity area to accommodate apparatus and responders SAFELY. |
Personnel Checklist
| Personnel | |
|---|---|
 |
ALL responders identifiable and in appropriate High Visibility apparel. |
 |
Be alert. Minimize exposure. Face traffic. |
 |
Place Flagger at accident vehicles site. |
Considerations Checklist
| Considerations | |
|---|---|
 |
Time of day and amount of traffic congestion. |
 |
Can vehicles be moved from roadway? Move It! |
 |
Can more lanes be opened? |
 |
Determine emergency vehicle access route(s). |
 |
Will closures create backups on other roadways? |
 |
How quickly can all lanes reopen? Minimize on-scene time. |
 |
Take steps to avoid secondary accidents. |
 |
Look for opportunities to make the scene SAFER. |
 |
Update dispatch periodically and as incident changes (escalation, termination, queue estimate, etc.). |
Haz-Mat Safety Checklist
| Haz-Mat Safety Checklist | |
|---|---|
 |
Notify dispatch immediately upon detection of an unidentified or placarded cargo spill. |
 |
Approach incident cautiously, from upwind. |
 |
Stay clear of hazardous cargo and the spill as well as any vapors, fumes, or smoke. |
 |
Identify the cargo from placards from a safe distance and update dispatch with the information. |
 |
Check the driver’s condition but only approach and assist if it is safe. |
Non-Cargo Fluid Spill Quick Action Guide Checklist
| Non-Cargo Fluid Spill Quick Action Guide | |
|---|---|
 |
Determine that spill is vehicle fluid, not cargo. |
 |
Stop leaking fluid at the source. |
 |
Contain and limit spill from spreading. |
 |
Apply available absorbents. |
 |
Sweep material off travel lanes. |
 |
Make second absorbent application if needed. |
 |
Gradually restore traffic flow. |
 |
Assure proper notifications are made. |
 |
Identify responsible party. |
 |
Mark location of material. |
Push Bumper Checklist
| Push Bumper Checklist | |
|---|---|
 |
Check bumper alignment. |
 |
Look for any obstructions. |
 |
Communicate with motorist:
|
 |
Advise motorist of the following:
|
 |
Make gentle bumper contact. |
 |
Check traffic. |
 |
Get the motorist’s vehicle in motion and back off. |
 |
Communicate clearly to STOP |
 |
Set the parking brake on the motorist’s vehicle. |
Visor Cards
ETTC for Shoulder Assist Visor Card
ETTC for Lane Blocking Incident Visor Card
Traffic Cone Placement Visor Card
| Traffic Cone Placement | |
|---|---|
 |
Start deploying cones at the rear of your vehicle and work your way upstream. |
 |
Always face traffic when placing or removing cones. |
 |
Space cones equally at least 20 feet apart. Use the striping marks as a distance reference to help with cone placement. The marks are on a 40 foot cycle. |
 |
Use 12 cones for the lane closure taper, which should be approximately 240 feet, and four cones along the activity area to quickly make the scene safer. |
 |
Place cones around response vehicles and place at least one cone downstream past the crash to allow a parking spot for the ambulance or EMS vehicle. |
 |
Increase the number of cones and the distance between cones as the speed of approaching traffic increases. |
 |
Borrow additional cones from other responding units or request some from another S/SP unit through dispatch if needed. |
 |
Improve traffic flow by moving the transition taper further upstream from the activity area as additional traffic controls are put in place. |
Incident Classification Visor Card

Major Incident
| Incident Classification |
|---|
MAJOR Incident = Expected Duration of More Than 2 Hours Examples: chain reaction or multiple commercial vehicle crashes; |
INTERMEDIATE Incident = Expected Duration of 30 minutes to 2 hours Examples: major roadway debris or cargo spills; overturned cars, RVs or small trailers; multi-vehicle crashes |
MINOR Incident = Expected Duration of Less Than 30 Minutes Examples: disabled vehicles in a travel lane or on the shoulder, minor crashes that can be moved or relocated to the shoulder, minor roadway debris. |

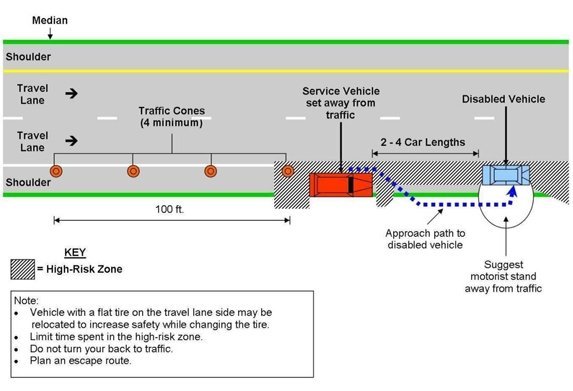
Minor Incident – Disabled Vehicle
Incident Priorities Visor Card
- Save lives:
- Make safety your first priority.
- Preserve the well being of responders, injured persons, and passing motorists.
- Stabilize the incident:
- Set up emergency temporary traffic controls.
- Prevent secondary crashes by warning approaching traffic.
- Practice safe, quick clearance; move crash vehicles as soon as permitted.
- Follow agency policy for scene preservation to protect evidence when necessary.
- Protect property and the environment:
- Contain spilled vehicle fluids to limit environmental damage.
- Upgrade traffic controls and advance warning.

