Appendix F: Actuated Signal Control
The actuated control model in CORSIM is an implementation of an eight-phase, dual-ring NEMA controller, as specified in the NEMA TS 1 and TS 2 standards. The model can be configured to emulate the operation of a Model 170 controller and many of its features, but the CORSIM terminology is taken from the NEMA specification.
The CORSIM actuated controller can be configured to operate in one of three modes: fully actuated, semi-actuated, or semi-actuated coordinated. In fully-actuated mode, detection is provided on all approaches to the intersection, and the controller operates without a common background cycle (i.e., operating “free”). In semi-actuated mode, detection is provided only on the side-street approaches (and perhaps main-street, left-turn movements). The main street signals remain green until a call for service is placed by the side-street detectors. In this mode, the controller operates without a common background cycle (i.e., operating “free”).
Semi-actuated, coordinated operation is used to provide progressive vehicle flow through a series of controlled intersections. In this mode, each controller in the coordinated system operates within a common background cycle length. The coordinator in the controller guarantees that the coordinated phases (generally phase 2 in ring 1 and phase 6 in ring 2) will display green at a specific time within the cycle, relative to a system reference point established by the specified cycle length and system synch reference time. An offset time, relative to the system reference point, is specified for each controller in the series to maintain the smooth progression of vehicles through the intersections. The coordinator also controls when and for how long non-coordinated phases can indicate green so that the controller will return to the coordinated phases at the proper time.
Specifying Approaches, Turn Movements, and Phases
In CORSIM, approaches to a controlled intersection are defined by links whose downstream node number identifies that same controlled intersection. The geometry of the intersection and its approach links determines which turn movements are physically possible from each approach.
The first step in specifying actuated control is defining the turn movements associated with each controller phase. The TRAFED actuated control interface will display all turn movements that are physically possible from each approach. Figure 74 shows a ring diagram that illustrates the concepts of NEMA phases, rings, and barriers.
It is typical to assign main-street movements to phases 1, 2, 5, and 6 and side-street movements to phases 3, 4, 7, and 8. For safety, the controller implements “barriers” that separate the two sets of phases: {1, 2, 5, 6} and {3, 4, 7, 8}. These barriers assure there will be no concurrent selection and timing of conflicting phases for traffic movements in different rings. Thus, phases in one set will not be concurrently active with phases in the other set. Regardless of the specification of which set of phases is main-street, do not mix main-street and side-street movements in the same set of phases on one side of the barrier. Left turn movements are typically assigned to the odd-numbered phases. Because of lane channelization and time-of-day restrictions, not all of the turn movements may be assigned to phases.
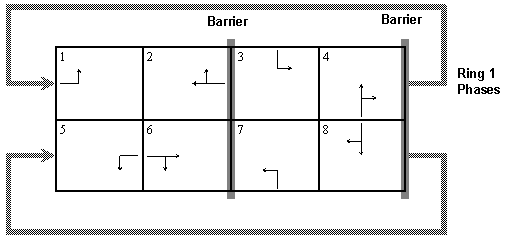
Figure 74 . Diagram. Typical traffic signal dual-ring diagram.
The actual number of rings and phases required depends on the layout of the intersection and the type of control implemented, e.g., split phasing or concurrent phasing. The following figure illustrates the standard NEMA phasing for a four-legged intersection with protected, leading main street left-turn phases (i.e., left turn phases come before the through phases).
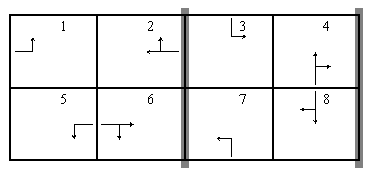
Figure 75 . Diagram. Standard NEMA phasing.
Figure 76 illustrates a ring diagram where the main street left turns are protected and lagging (i.e., come after the through phases) and the side street left turns are protected and leading.

Figure 76 . Diagram. Lagging left turn phase
When specifying lagging phases in TRAFED, the phase boxes are not rearranged as illustrated above. Rather, the analyst must select the phase order for each of the phase pairs, 1 and 2, 3 and 4, 5 and 6, 7 and 8 on the Phase Sequence tab of the actuated control interface.
Figure 77 through Figure 79 illustrates how several other common types of signal phasing can be implemented in CORSIM.
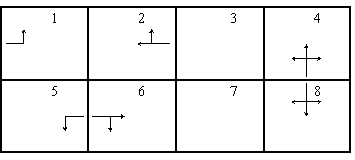
Figure 77 . Diagram. Leading protected left turns on the main street, concurrent side-street phases.
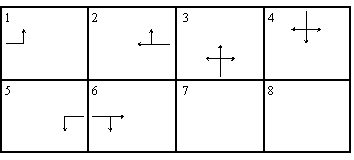

Figure 79 . Diagram. Single Ring, Split Phasing.
Specifying Detectors
Once the phases have been assigned turn movements, detectors can be specified on the approaches and associated with the phases that are affected when the detectors are actuated. The type of detector used and its location on the approach links depends on the purpose of the detector. Extension and count detectors operating in presence mode and located at the stop bar are typically used to signal the controller that there is demand for a phase to be serviced. Extension and count detectors operating in passage mode and located upstream of the stop bar are typically used for extending the green time for a phase or when implementing the volume/density functions of the controller.
CORSIM supports the specification of detectors on links that are not direct approaches to the intersection under control, but that are used by the controller at the intersection. These additional, or indirect approaches, are used when emulating a field system where two intersections are controlled by one controller. They are also used when a direct approach is not long enough to support the location of an upstream detector, which must be placed on the upstream link that connects to the direct approach. In CORSIM, a maximum of five links can be direct approaches to an intersection node. However, up to 10 links can have detectors that support the operation of the controller at an intersection, including the direct approaches. Thus, for an intersection with four direct approaches, six additional links can be specified if required.
Specifying Phase Timing Parameters
Once the approaches have been configured (i.e., phases have be assigned turn movements and detectors have been specified), time parameters can be specified for the phases using the Time Settings tab on the TRAFED actuated control interface. These parameters are standard parameters found on any controller that conforms to the referenced NEMA standards. TRAFED is designed so that the more commonly used timing parameters are located on the Time Settings tab. Phase split times can only be entered when the controller is operating in a coordinated mode. Thus, the split times will be discussed later in the section on coordination.
CORSIM offers two approaches to limiting the amount of time a phase can remain green under continuous flow conditions (i.e., continuous demand with no significant gaps between vehicles). To understand how the two approaches differ, the factors that affect the phase green duration must be examined. There are two basic components to the phase green time: the initial interval and the extendable interval. The initial interval is determined by the specified minimum green and the variable initial operation. When variable initial operation is enabled, the initial interval is computed at the beginning of phase green based on the vehicle detections that occurred during the immediately preceding yellow/red interval (see next section). Thus, the initial interval can vary from cycle to cycle, but it can never be less than the specified minimum green nor greater than the specified maximum initial interval. Furthermore, the controller will hold the phase in green for the duration of the initial interval regardless of demand or conflicting calls.
During the extendable interval, the phase will be allowed to terminate (e.g., gap out) if the vehicle headways exceed the specified vehicle extension (passage) time. However, the phase must terminate at the end of the extendable interval, even when there is demand. In CORSIM, the duration of the extendable interval is either calculated from the specified maximum green or can be directly specified, but each approach yields a slightly different behavior, as explained below.
Maximum Green
Maximum green is the maximum amount of time a phase will be allowed to be active (i.e., display green), and includes both the initial and extendable intervals. The duration of the extendable interval is allowed to vary based on the actual initial interval, as follows:
![]()
Figure 80. Formula. Extendable interval duration
Thus, the total green duration under continuous flow conditions will remain constant and equal to the specified maximum green time.
Maximum Extension
Maximum extension is the amount of time a phase will be allowed service after the minimum green and variable initial have timed out. The extendable interval is held constant and equal to the specified maximum extension, and the max phase green duration is allowed to vary based on the actual initial interval, as follows:
![]()
Figure 81. Formula. Max phase green duration.
Thus, the total green duration under continuous flow conditions could vary from one cycle to the next, depending on the duration of the initial interval. While some controller manufacturers still use maximum extension, it is more commonly found in older, isolated NEMA and Type 170 controllers.
Specifying Volume/Density Function Parameters
Additional timing parameters may need to be specified if the controller being modeled implements volume/density functions. CORSIM implements two volume/density functions specified by the NEMA standard: variable initial and gap reduction. The parameters for these functions are specified on the Volume/Density tab of the TRAFED actuated control interface.
Variable Initial
Variable initial timing is used to increase the initial green interval of a phase based on the demand for that phase during its previous inactive (yellow and red) state. This extra time provides an opportunity for a stopped platoon of vehicles to proceed through the intersection before the phase’s passage timer is allowed to become active. This function is ineffective with long presence detection located at the stop line. The concept of variable initial timing is illustrated in Figure 82.
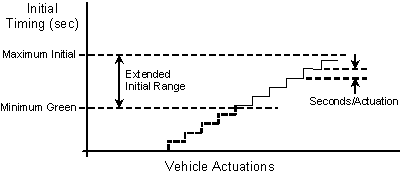
Figure 82. Chart. Variable initial timing.
CORSIM supports three types of variable initial operation:
- Extensible initial: The extensible initial period is a method of calculating the variable initial period commonly used in field practice. With this method, the variable initial interval is increased from zero by the specified seconds/actuation for each vehicle actuation received by a phase during the yellow and/or red signal up to the specified maximum initial time. The initial timing will not exceed the maximum initial time and will not be less than the minimum green time. This method is common in both Type 170 and NEMA and is the method illustrated in the previous figure.
- Added initial: The added initial method is similar to extensible initial with the exception that the seconds/actuation calculation does not begin until a user-specified number of vehicles actuations have occurred. Also, the variable initial interval is increased from the minimum green time rather than from zero. The added initial option is generally used when long minimum green times are specified. If this option is selected for any phase, it must be selected for all phases.
- Computed initial: The computed initial method calculates the amount of time given to each vehicle actuation (computed seconds per actuation) during the yellow and red signal display of the phase based on the following formula:
- Specified maximum initial time divided by the specified number of actuations that can be serviced during the minimum initial interval times the number of recorded actuations.
The total time allowed for the computed initial interval is limited by both the minimum green time and maximum initial interval.
Gap Reduction
Gap reduction, as the name implies, reduces the gap or allowable headways between vehicles from a starting value (maximum gap) to a lesser value (minimum gap) over a specified amount of time. While gap reduction is used sporadically in the field, it can be a valuable tool. For example, assume there is an approach to a fully actuated intersection that experiences a very sluggish “start-up,” creating excessive headways until vehicles are moving at a more normal speed. If the gap is set where it should be for the normal speeds, the phase would constantly gap-out early. If, however, the gap were set to accommodate the start-up vehicles, the phase would run to maximum green more times than necessary. This problem could be handled by providing a long minimum green time or extending the vehicle call, but those actions would also contribute to an inefficient signal operation. By providing a longer than normal vehicle extension (gap) time at the beginning of the signal phase and then reducing the gap to a more reasonable value following the vehicle start-up time, the problem is relieved with little or no effect on efficiency. Similarly, gap reduction can reduce the problems experienced at intersections with large fluctuations in traffic volumes during the day. Generally these intersections have low vehicular volumes with long vehicle headways during off-peak travel times and shorter headways during peak travel periods. Gap reduction techniques could provide a longer gap at the beginning of the phase when volumes are low, headways are long, and an overall shorter cycle length is provided. The gap would then be reduced to a lesser value as volumes increase, headways decrease, and the cycle length increases.
CORSIM supports three types of gap reduction as illustrated in Figure 83:
- Reduce by/Reduce every. The gap is reduced by a user-specified amount for every user-specified interval. Older Type 170 controllers only support this option.
- Reduce by every second. The gap is reduced by a user-specified amount every second.
- Time to reduce to minimum gap. The gap is reduced from a specified maximum value to a specified minimum value over a user-specified amount of time. This method of gap reduction is commonly used in the field and is supported by all NEMA and newer model Type 170 controllers.
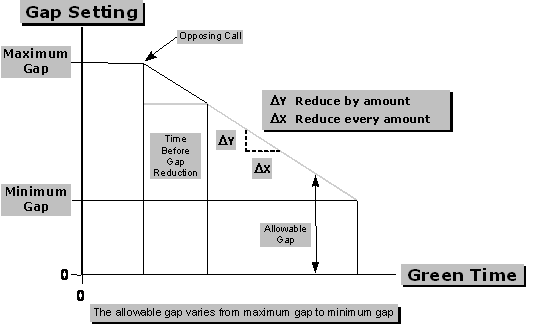
Figure 83. Chart. Gap reduction concept.
Usage Notes:
- To disable gap reduction in CORSIM, set the minimum gap equal to the maximum gap.
- For any method of gap reduction in CORSIM, the gap begins to be reduced at the receipt of a call on a conflicting phase. This is generally, but not always, the beginning of phase green. Unlike the CORSIM model, NEMA and newer Type 170 controllers allow the field engineer to specify an amount of time from the beginning of phase green until gap reduction begins. This value is called “Time Before Reduction” and is commonly used in the field when gap reduction is active. To incorporate this value in CORSIM, the analyst should assume there is always a conflicting vehicle call (which is generally the case) and should specify the CORSIM Time-to-Reduce parameter as the sum of the Time-Before-Reduction and Time-to-Reduce values obtained from the controller. This will tend to flatten the slope of the gap reduction line but will generally make little difference in the analysis. If the analyst would prefer to maintain the slope of the gap reduction line, the gap reduction line can be extended back to the beginning of phase green, and the gap value at that point should be specified for the maximum gap. Although neither approximation produces an exact simulation of the field operation, either method should produce acceptable analytical results when compared to actual field data.
- CORSIM enforces a 1.1 second minimum value for minimum and maximum gap values, although lower values are common in field applications where a long detection zone presence detector is used. While the analyst can input lower values, CORSIM will reset these lesser values to 1.1 seconds. Depending on the detector configuration, traffic volumes and vehicle headways, this limitation may have little impact on the intersection analysis.
Specifying Phase and Unit Control Parameters
The Phase Controls tab in the TRAFED interface allows the analyst to specify basic operational characteristics for each phase, in addition to the phase timing parameters that were specified on the Time Settings tab. The Unit Controls tab is used to specify operational characteristics that apply to the entire controller. The following paragraphs provide more details regarding these operational characteristics.
Min and Max Recall
A phase can operate with either min recall or max recall, but not both. With the minimum vehicle recall active and in the absence of a vehicle call on the phase, a temporary call to service the minimum initial time will be placed on the phase. If a vehicle call is received prior to the phase being serviced, the temporary call will be removed. Once the phase is serviced it can be extended based on normal vehicle demand. With the maximum vehicle recall active, a constant vehicle call will be placed on the phase. This constant call will force the controller to time the maximum green. Maximum recall is generally used to call a phase when local detection is not present or inoperative.
Usage Notes:
- CORSIM does not currently support soft recall or call to non-actuated. If the analyst encounters either of these functions in a field controller, minimum recall should be used to approximate soft recall and maximum recall should be used for call to non-actuated.
- If the controller is in a coordinated system and the coordinated phases (2 and 6) are not actuated, then either minimum recall or maximum recall must be set active for the controller to service the coordinated phases.
Dual Entry
When dual (double) entry is specified, a vehicle call on one phase, in the absence of a call on a compatible phase, will automatically place a call on the primary corresponding compatible phase. For example, assume the intersection being simulated is under light traffic conditions and its controller is using the standard NEMA phase numbering scheme illustrated in Figure 75. A call for service is received on phase 2, but there are no other calls on phase 5 or 6. With dual entry active, the call on phase 2 automatically places a temporary call on phase 6. When phase 2 becomes active and no call has been received on phase 5, phase 6 will be displayed simultaneously with phase 2. If a call had been received on phase 5 before phase 2 became active, the temporary call on phase 6 would have been removed and phases 2 and 5 would have been displayed. In the standard NEMA phase numbering scheme, compatible dual-entry phases are 1 and 5, 2 and 6, 3 and 7, and 4 and 8. If dual entry is not active, a vehicle call on a phase will only allow the display of that phase in the absence of a call on a compatible phase. The usage of dual entry is generally a policy decision by the local DOT. However, common usage is to have dual entry active on the NEMA standard even-number phases (through movements) and inactive on NEMA standard odd-number phases (left-turn movements).
Red Revert
Under very light traffic conditions and fully actuated control, it is possible for a phase to go from green to yellow and then back to green without ever displaying a red indication. Red revert timing prevents this signal display sequence by forcing the red indication to be displayed after a yellow for at least the red revert time. Red revert is generally factory programmed at two seconds and seldom changed by the field engineer.
Simultaneous Gap
The operational logic for both NEMA and Type 170 controllers specifies that both controller rings 1 and 2 (refer to the figure included in the discussion of Dual Entry) must cross the barriers at the same time. This can be accomplished by each of the phases 2 and 6 gapping-out, maxing-out, or forcing-off. With simultaneous gap-out inactive, one ring can gap-out and the other can max-out. Additionally, once a phase gaps-out it will stay in that condition, regardless of any future vehicle actuations until the phase in the opposite ring either gaps-out or reaches max-out and then both phases cross the barrier. With simultaneous gap-out active, neither ring can cross the barrier until both phases have been terminated in the same manner, either by both gapping-out or both maxing-out. Additionally, if a phase initially gaps-out and then, due to increased vehicle demand, vehicle arrivals are less than the extension time, the gap-out flag for that phase is removed. With simultaneous gap-out active, the vehicle headways on both phases must currently be exceeding the current gap value. The inactive status for this function generally produces a quicker reacting signal installation and shorter cycle lengths.
Conditional Service
When a heavy left-turn demand exists at an isolated (i.e., not coordinated) intersection, it may be desirable to service one of the left-turn phases twice in the same cycle. Conditional service, under a specific set of circumstances, allows the left turn to be serviced first as a leading phase and then as a lagging phase. Enabling conditional service will allow the simulated controller to operate in this manner under the following circumstances:
- There is a call for service on a leading left-turn phase.
- The controller is operating in a non-coordinated mode.
- There is a conflicting call on the opposite side of the barrier. Otherwise the left-turn phase will automatically be serviced next by standard controller logic unless the anti-backup controller feature is active.
- The through phase of the phase pair with the left-turn call for service has gapped-out.
- The time remaining on the active through phase’s maximum timer exceeds the conditional service phase’s minimum conditional service time.
Conditional service should not be confused with conditional re-service, which is currently not supported by CORSIM.
Red and Yellow Lock
Red lock is not supported by NEMA controllers and is not a common function in Type 170 controllers. When red lock is set to “on” (active), the controller “remembers” vehicle actuations that occur during the red display of the signal phase. When the controller determines if the phase should be called for service, it uses the remembered actuations to call the phase to service, even if the phase has no currently occupied detectors. When red lock is set to “off” (inactive), the controller does not remember actuations and the phase will be called to service only if it has a currently occupied detector. Red lock should not be set active unless the controller being analyzed specifically has a “red locking memory” that is active.
Most NEMA and Type 170 controllers use yellow lock as a factory standard setting that cannot be changed by the field engineer. However, some manufacturers provide this memory lock as a toggled option. When yellow lock is set to “on” (active), the controller “remembers” vehicle actuations that occur during the yellow and red display of the signal phase. When the controller determines if the phase should be called for service, it uses the remembered actuations to call the phase to service, even if the phase has no currently occupied detectors. When yellow lock is set to “off” (inactive), the controller does not remember actuations and the phase will be called to service only if it has a currently occupied detector. In no case should the locking memory set to “off” be considered as a red lock “on”. Both red lock and yellow lock can be set as inactive but both cannot be set active because yellow lock includes the actuations during the red interval.
Pedestrian Recall and Rest
When pedestrian recall is enabled, a pedestrian call for service will be input to the controller. When pedestrian recall is active, both the vehicular and pedestrian timing for the phase are active. When pedestrian rest is enabled the pedestrian WALK interval will rest in the phase. Either pedestrian recall or pedestrian rest can be specified, but not both.
Red Rest
This unit function designates that all phases of the controller are allowed to rest in red in the absence of calls or recalls on any phase. While this function is not uncommon, especially for an isolated intersection with relative even traffic flows on all approaches, it is the more general practice to allow the controller to rest in green on the mainline approaches in the absence of calls. To provide this behavior, rest in red would be set inactive.
Specifying Phase Sequence and Overlapping Phases
Phase Sequence
The concept of lagging phases was introduced in the section describing the assignment of turn movements to phases. A phase can be specified as a lagging phase on the Phase Sequence tab in the TRAFED actuated control interface. For the purposes of this discussion, a phase pair is defined as adjacent phases in the same ring on the same side of the barrier on a standard NEMA phase diagram (refer to the figure included in the discussion of Dual Entry). Therefore, phase pairs are phases 1 and 2, 3 and 4, 5 and 6, and 7 and 8. Phase pairs are not NEMA compatible signal display phases such as 1 and 5, or 2 and 6.
In a standard NEMA 8 phase configuration operating in leading dual lefts on both streets, phases 2, 4, 6 and 8 are lag phases while phases 1, 3, 5, and 7 are leading phases. For a lead/lag sequence, phase 2 can lead, and phase 1 can lag. This will produce the signal display sequence of phases 2 and 5, then phases 2 and 6, then phases 1 and 6. It is also possible to have both left turns lagging by specifying phases 2 and 6 as leading and phases 1 and 5 as lagging.
Overlapping Phases
An overlap is a vehicle movement, generally a right turn, which is allowed to run concurrently with two standard phases. For example, in Figure 84 the phase 4 right turn movement from link (10, 4) is defined as overlap “A”. Usually a 5-section signal head with a right arrow controls this type of overlap movement. In this case, overlap “A” is allowed to run concurrently with not only phase 4, under green ball control, but also whenever phase 1 is active in either the phases 1 and 5, or 1 and 6 combination. Therefore phases 1 and 4 are “parent” phases to overlap “A”. When overlap “A” is active with phase 1, the signal controlling the overlap movement is generally displaying a green right arrow indication.
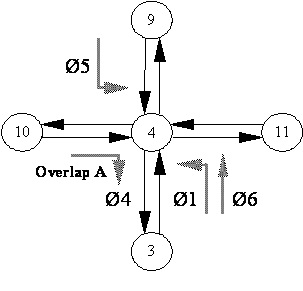
Figure 84. Illustration Overlapping Phase.
When a movement is added to the phase diagram, TRAFED automatically determines if the movement occurs in adjacent phases and can be considered a potential overlapping movement. If so, the movement is indicated as a green arrow in the phase diagram. However, potential overlap movements will not operate as overlapping movements in CORSIM unless the parent phases are specified in the Phase Sequence tab.
Specifying Pedestrian Demand
CORSIM does not simulate pedestrian traffic 2. Therefore, when modeling a controller that implements pedestrian phases, the analyst must specify pedestrian demand parameters for CORSIM to emulate pedestrian calls to the controller. CORSIM supports three pedestrian actuation modes as follows:
- Actuation based on the stochastic arrival of pedestrians.
- Actuation based on the deterministic arrival (constant headways) of pedestrians.
- Actuation based on the periods of constant pedestrian demand (pedestrian push button is continuously depressed).
It is not necessary to define the pedestrian generator unless the pedestrian demand conflicting with the turn movements from the phase being programmed is greater than 100 crossings per hour and is defined in the data for the link serviced by the phase. The absence of generator data for any phase with less than 100 crossings per hour will have no impact on the CORSIM analysis or the output MOEs. However, it may be prudent for the analyst to define the pedestrian generator data for approaches and phases with low pedestrian crossing values in order to show observers of the animation how a pedestrian signal would operate at an intersection even though the output MOEs would not be affected.
It should be remembered that the pedestrian signal associated with a phase is for pedestrians crossing the approaches that receive the left and right turn movements from the phase being coded. For example, assume an isolated intersection is being coded where north is up, as shown in the following figure. In Figure 85, approach 1, 2, 3, and 4 are the westbound, northbound, eastbound, and southbound approaches to the intersection respectively. Also in the example, phase 2 displays green for all movements from the westbound approach. When specifying generator data for phase 2, the pedestrian volume and other data input are for pedestrians crossing approaches 2 and 4. Additionally, the pedestrian intensity code must be set for the link assigned as approach 1.
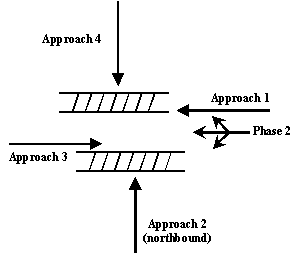
Figure 85. Diagram. Pedestrian demand.
Pedestrian generation mode 1 would typically be used for an intersection with relative light pedestrian volumes. Pedestrian generation mode 2 would typically be used at an intersection in a downtown business district during the lunch hour. Pedestrian generation mode 3 would typically be used at an intersection adjacent to a commuter train station where continuous pedestrian demand exists, followed by a period of no demand, followed by another period of continuous demand when the next train arrived.
CORSIM does not have the ability to simulate an exclusive pedestrian phase using the phase 9 method as provided by many controller manufacturers. However, in a limited number of situations where there are unused phases in the controller, the analyst may be able to employ one of those phases as an exclusive pedestrian phase. One such situation is the mid-link pedestrian signal. In this case the analyst can place node with actuated control at the location of the crossing signal. The vehicle through movements can be coded in phase 1, and phase 2 can be coded as the exclusive pedestrian phase. There are other possible configurations, but the analyst is cautioned to be careful when coding an unused phase as an exclusive pedestrian phase because the phase may be concurrent with a phase in the opposite ring.
Specifying Coordination
CORSIM can model any type of coordination control (i.e., hardware and master coordinator, telemetry communications and closed loop master, central office control, or any form of time-based local coordinator control) as long as the local controller is either a NEMA or Type 170 or equivalent.
Coordinated operation is used to provide progressive vehicle flow through a series of controlled intersections. Each controller in the coordinated system is semi-actuated and operates within a common background cycle length. Typically, the coordinated phases are not actuated and are placed in maximum vehicle recall. Furthermore, an offset time, relative to the system reference point, is specified for each controller in the series to maintain the smooth progression of vehicles through the intersections. The controller’s coordinator also controls when and for how long non-coordinated phases can indicate green so that the controller will return to the coordinated phases at the proper time.
It should be noted that an isolated actuated controller operating with maximum recalls active on all phases is not the same as operating with a background cycle length. This type of operation does not require coordination data to be specified to allow the mainline phases to begin operation at some random point in the cycle.
Finally, CORSIM allows the simulation of networks that contain both coordinated and non-coordinated (“free”) controllers.
Prior to describing how to specify coordination parameters, the following discussion is presented as a summary explanation of coordination in general and how it is handled by CORSIM. The following typical timing dial diagram and phase split diagram represented in Figure 86 and Figure 87 present a graphical representation of the coordination parameters, and should be referenced throughout the remainder of the discussion.
Coordinated Operation
All controllers operating within a coordinated system must have the same common background cycle length (multiples of the background cycle length are allowable if a controller is being “double cycled”). Within the background cycle length, the coordinated (or sync) phases (phases 2 and 6 in CORSIM) are guaranteed to display green at a certain time (start of coordinated phases) and for a minimum duration (split) within the background cycle length. If the controller is in the coordinated phases, it will remain there until the split has been timed out and a call for service during the time that calls are allowed to be registered by the controller (permissive period) has been received on some non-coordinated phase. The point at which the controller is allowed to leave the coordinated phases to service other phases is the yield point, and in CORSIM it is always measured from the system reference (sync) point (system time T = 0) to the end of phase 2 and 6 green. The system reference (sync) points are defined by the actuated controller sync reference time and the background cycle length. The yield point is the local reference point used internally by the controller and is referred to as “local zero or local t = 0.” As will be seen later, the yield point is directly related to the controller’s offset parameter.
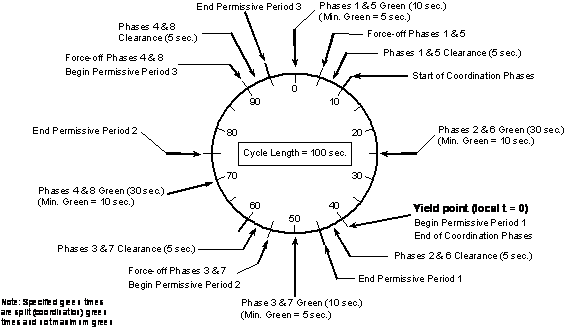
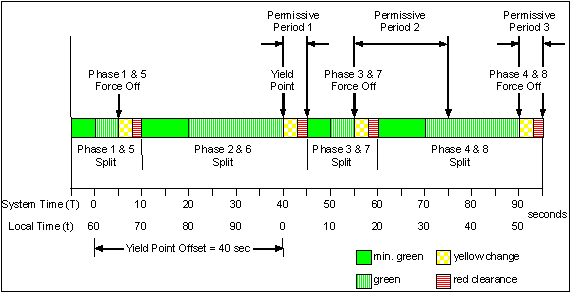
Figure 87. Chart. Phase split diagram.
Once a non-coordinated phase becomes active, i.e., displaying green, it will stay in that phase until it either gaps-out, reaches max-out, or reaches its force-off point (the end of its split duration or the maximum time the phase is allowed to remain green within the background cycle length). Additionally, any of the three permissive periods not used within the current cycle are removed and the controller is allowed to service vehicle/pedestrian actuations normally. However, force-off points remain active to ensure the controller returns to the coordinated phase at the proper time in cycle. The analyst is cautioned that the maximum green time for each phase is generally considered to be an isolated intersection function and may not be appropriate for all cycle lengths and split combinations to be simulated. Many system operators disable the maximum green function when the controller is in coordination. This is done by enabling the controller function “Inhibit Max Termination.” When this function is enabled, phases can then only be terminated by gapping-out or by a force-off as described in the previous paragraph.
Because all controller phases may have to be serviced within any background cycle length, it is not possible to allow the controllers to service calls any time there is demand as is common in an isolated actuated operation. Permissive periods provide specific intervals when the controller can respond to these calls. CORSIM and many field controllers provide three permissive periods at user-specified times within the cycle. When modeling dual leading lefts on both streets using the standard NEMA phase numbering, permissive period 1 is generally programmed to allow the controller to service vehicle or pedestrian calls from phases 3 and 7, 4 and 8, and 1 and 5. Permissive period 2, occurring later in the cycle, allows service to phases 4 and 8, and 1 and 5. Permissive period 3 only allows service to controller phases 1 and 5.
While many permissive period configurations are in everyday usage in field operations, the following is fairly common and is used as a default by several controller manufacturers. CORSIM requires the beginning of permissive period 1 to be at the end of green for the coordinated phases (i.e., the yield point or local zero). This is the point at which the permissive window opens to respond to calls for service. The end of permissive period 1 will be at the point in the next phase where, if activated, there is still time remaining in the phase to service the clearance period for the current phase and the minimum green or pedestrian times before the force-off point for that phase is reached. Mathematically, it is the phase 3/7 split – phase 3/7 clearance – phase 3/7 minimum green, where “3/7” indicates potentially concurrent phases 3 and/or 7. The beginning of permissive periods 2 and 3 will be at the force-off points for phases 3/7 and 4/8, respectively. The end of permissive period 2 and 3 will be at the minimum service green point for phases 4/8 and 1/5, respectively.
Finally, while yield point, permissive period, and force-off times are not common coordination timing input values in newer NEMA or Type 170 controllers, these are the parameters used by the coordinators inside the controller. However, most modern controllers use the more common data input of cycle length, split and offset and then convert the data to yield point and force-off times for use by the coordinators. Because of this, TRAFED also uses cycle length, split, and offset data inputs. It automatically converts those input values to yield point and force-off times for use by CORSIM. See appendix J for a description of the conversion process.
Specifying Coordination Parameters
The TRAFED actuated controller dialog was designed to reduce the amount of input an analyst must supply for basic coordinated systems. For many coordinated systems, the analyst need only specify the data in the dialog’s Operation Group (i.e., cycle length and offset) and the phase splits in the Time Settings tab. TRAFED provides reasonable default values for all other “advanced” coordination parameters. However, should the analyst need to review or change those parameters, they are accessible via the Actuated Controller Coordination dialog.
Cycle Length
While the cycle length is entered for each controller, the value should be the same for all controllers that are in the same coordination series. For example, a network may contain multiple independent arteries, each requiring a different background cycle length to maintain progression. CORSIM allows the specification of multiple background cycle lengths in a network, but the analyst is responsible for using the proper cycle when specifying each controller.
Because the phase split times must total to the cycle length, changing the cycle length for a controller in TRAFED will cause the split values in the Time Settings tab to be automatically updated.
Actuated Control Sync Reference Time
The sync reference time is used for coordinating actuated controllers within the traffic network, and specifies the time of day at which the actuated controllers are synchronized. The sync reference time is not specified on the actuated controller dialog in TRAFED, but is specified in the Network Properties dialog under the Controllers tab.
This value, along with the background cycle length, specified for each controller, defines the “system zero” (T = 0) times for the controllers. The offset time specified for each controller is relative to the system zero. For example, if the sync reference time is 2:00 a.m. and the background cycle length is 100 seconds, system zeros occur at 02:00:00, 02:01:40, 02:02:20, and so on.
If not used, the sync reference time depends on the specified simulation start time and the length of the initialization period. This value must be specified to control the sync reference time. When the sync reference time is specified, CORSIM will automatically force the initialization period to run to the specified maximum value.
Offset
In TRAFED, the offset value for a controller is measured from the system reference point (T = 0) to the start of the coordinated (sync) phases, as specified in the NEMA TS 2 standard. TRAFED will automatically convert the offset value to yield point for use by CORSIM. The yield point is defined as the time, in seconds, from the system reference point (T = 0) to the end of green for the coordinated (sync) phases.
Inhibit Max Termination
For a coordinated controller, the phase maximum green values are often set low to enable the controller to function in the isolated backup mode, e.g., in the case that one or more detectors fail. Assuming a long cycle length and split, it is possible that once the phase is active it will always terminate at the end of maximum green and never reach the phase force-off point. Controller manufacturers have implemented the Inhibit Max Termination function to resolve this problem.
When the Inhibit Max Termination function is enabled, the controller will allow phases to terminate by “gap-out” or by “force-off” but will not allow phases to “max-out”. This is a unit (controller) function and cannot be set independently for a specific phase.
Phase Splits
A phase split controls the duration of a phase and includes the yellow change and red clearance durations as well as the green time for the phase. In most cases, the total of the splits for the phases within a ring must add up to the cycle length. In cases where some of the phases are unused, the splits in a ring may not add up to the cycle length. Also, the sum of the splits for the phases in a ring on one side of a barrier must equal the sum of the splits for the phases in the other ring on the same side of the barrier. TRAFED will warn the user when there is an error in the split value specification. Splits are specified in the TRAFED Time Settings tab, which allows the analyst to specify splits either as absolute times or as percentages of the cycle length.
Specifying Advanced Coordination Parameters
If a controller uses a non-standard permissive period specification, the analyst can specify the permissive period parameters using the Advanced Coordination dialog in TRAFED. That dialog also provides access to other parameters that control the operation of the coordination and parameters that govern how a controller transitions between different timing plans.
Permissive Periods
CORSIM allows the specification of up to three permissive periods. During these periods, calls can be answered for phases other than the sync phases. Each permissive period has a begin time and an end time and can overlap; i.e., the beginning time for one can occur before a previous permissive period has ended.
Once the controller yields, all subsequent permissive periods are disabled for that cycle and the controller will sequence normally from that point depending on demand. Once the controller returns to the sync phase during a cycle, it will stay in the sync phase until the next yield point.
In CORSIM, at least one permissive period should start at the yield point (t = 0), i.e., the starting time of at least one permissive period should be 0.
Each non-sync phase can be assigned to any or all of the three permissive periods. Note that phases 2 and 6 are not assigned permissive periods. All other active phases must be assigned to a permissive period or they will not be serviced.
TRAFED provides three options for defining the permissive periods used in coordination:
- Remaining Phases in Cycle.
- Next Phase in Cycle.
- Manual Specification.
For the “Remaining Phases in Cycle” option, the start of permissive period 1 is at the yield point; the start of permissive period 2 is at the force-off of the next phase in sequence after the sync phase; and the start of permissive period 3 is at the force-off of the next phase in sequence after the phase used in permissive period 2. The end times for the permissive periods are set so that if a phase is activated during the permissive period, it will be able to service its minimum initial plus its yellow change plus its red clearance intervals before reaching its force off. For each permissive period all remaining phases that occur before the next sync phase can be serviced.
For the “Next Phase in Cycle” option, the permissive period start and end times are calculated in the same way as for the “Remaining Phases in Cycle” option. However, for each permissive period only the next phase in sequence can be serviced.
The “Manual Specification” option enables the user to code a set of permissive periods that do not conform to the other two default options. When using this option, remember that the time parameters are referenced to the controller’s yield point, not to the system (sync) reference point or to the offset time.
Extended Side-Street Leading Left-Turn Phases
Preset signal splits based on pedestrian timing requirements can be dynamically altered by the simulated controller when no side street pedestrian demand exists. This feature causes the controller to skip the side street pedestrian phase when no demand exists and extend the force-off time for the leading left-turn side-street phases. In the absence of actuated pedestrian calls, modern controllers allow force-off points for leading left-turn phases to be extended into what would normally be the next through phase. For example, assume the phase 4 and 8 split is controlled by the time it takes to accommodate pedestrian timing and not vehicle demand. In the absence of pedestrian actuations, the phase 4 and 8 green time could be shortened and the extra green time given to a heavy demand left turn on phases 3 and 7. This function must be manually set to be active in the controller and phases and times defined. The status of this controller function should be determined prior to CORSIM analysis.
From the Advanced Coordination dialog, the analyst can specify up to two leading side-street left-turn phases that can be extended beyond their normal force-off time when no pedestrian demand exists. When using this option, the analyst must also specify the number of seconds that the force-off times can be extended for the corresponding phases.
Phase Termination Flags
During coordinated operation, a hold can be placed on user-selected phases to prevent those phases from terminating before their force-off point is reached. This is desirable when lead-lag left-turn phasing combinations are used to maximize two-way progression. Placing a hold on a lagging left-turn phase prevents that phase from premature “gap-out” and ensures that the phase does not terminate until its force-off point is reached. This prevents the concurrent through phase from terminating prematurely and shortening the progression band in that direction.
The lag phase hold input is commonly used in closed-loop systems that do not have local intersection vehicle detection. Once the phase is initialized, by either minimum recall or maximum recall it will continue to display green; not terminating until its force-off point is reached. Furthermore, the maximum green (or maximum extension) and passage time inputs will be ignored. The user is cautioned not to confuse this input with the controller function “Inhibit Max Termination”. That function allows the controller to “gap-out” or be “forced-out” but not “max-out”. The lag phase hold to force-off function will only allow the controller to be “forced out” and has no impact on controllers that are not operating within a coordinated system.
Plan Transition Settings
New timing plans can be implemented in actuated controllers by changing the parameters for an actuated controller in subsequent time periods, as scheduled by time of day or some other mechanism. The analyst can specify how the controller will transition between plans to maintain the progression of the coordinated system. Specification of a new plan does not necessarily require transition, but transition may be required if either the offset or cycle time are changed.
Typically, if the offset of a new plan is different from the old plan, then the controller will have to transition to the new plan. This is a 3-step process and may take several cycles. First, at the end of the coordinated phase, the splits and cycle time of the new plan are loaded. Next the cycle time of this new plan is adjusted over a period of several cycles until the actual specified offset of the new plan is obtained. When the current signal timings are in step with the desired timing plan, the cycle time is restored to the cycle time of the new plan.
Figure 88 illustrates how a controller might transition to a new plan. This figure was adapted from, Bullock, D., T. Urbanik, and A. Catarella, “Traffic Signal System Progression Recovery from Railroad Preemption,” Proceedings of the Fifth International Symposium on Railroad-Highway Grade Crossing Research and Safety, October 20-22, pp. 355-365, 1998. Sub-figure (a) depicts the desired (new) signal timings with an offset of O. Sub-figure (b) shows the signal timings after the split and cycle time parameters of the new plan have been loaded into the controller. If no adjustment is made to these signal timings, the timing plan in the controller will always start main-street green late (by the offset difference O' – O) and the intersection will not be well coordinated. Sub-figures (c) and (d) illustrate how the transition process can be accomplished by extending (Add method) or shortening (Subtract method) the cycle time of the new plan. After each cycle, the offset difference decreases and eventually the offsets shown in these figures are consistent with the offset shown in sub-figure (a).
In general, new timing plans can include changes to the majority of the actuated controller parameters. A free-controller loads the new parameters (new plan) at its first phase 2 amber indication following the time period change. A coordinated controller loads the new parameters (new plan) at its first yield point (end of phase 2/6 green) following the time period change. When a controller is coordinated and the new plan includes changes to either its cycle length or offset, then the controller must transition from its old plan to the new plan according to one of the transition methods described in the following paragraphs.
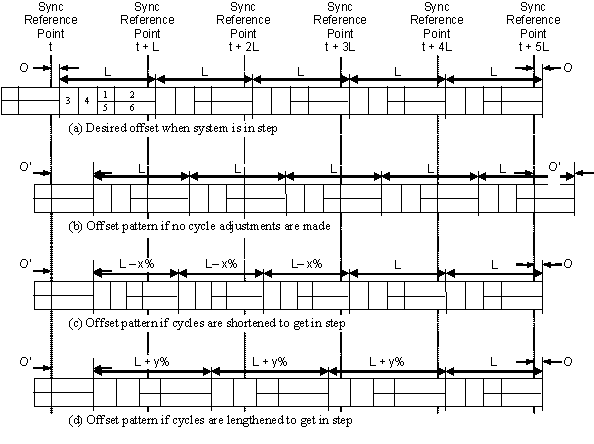
Figure 88. Diagram. Example of timing plan transitions.
CORSIM supports four transitions methods:
- Short Way.
- Dwell.
- Add.
- Subtract.
To determine if a transition is required, the transition manager in the actuated control logic computes the difference between the next local zero (yield point) for the current plan and the next local zero for the new plan. The local zero for a plan is computed from the system sync reference time, the plan cycle length, and plan offset. If there is a difference, then a transition is required. The following paragraphs describe the operation of each transition method:
Short Way: The Short Way method is a composite of the Add and Subtract methods. At the controller’s yield point in each cycle during the transition, the transition manager computes the local zero difference as described above. The transition manager then determines if it is shorter (less time) to make up this difference by implementing an Add transition or a Subtract transition for the next cycle. Some controller vendors refer to this method as “Smooth” or “Best Way”.
Dwell: For the Dwell method, the transition manager computes the local zero difference, as described above, just prior to the controller’s yield point. Then the Dwell method logic extends the current phase 2/6 green by the difference, up to the maximum percent of cycle length specified. If the difference exceeds the maximum allowed, the Dwell method logic continues to add green time to the phase 2/6 split for subsequent cycles until the difference is made up.
Add: At the controller’s yield point in each cycle during the transition, the transition manager computes the local zero difference as described above. Then the Add method logic adds time to each of the phase splits for the upcoming cycle, where the total amount of time added does not exceed the maximum percent of cycle length specified. The amount of time added to each phase is based on its percentage of the cycle length in the new plan. If the local zero difference exceeds the maximum allowed, the Add method logic continues to add time to each phase over multiple cycles until the difference is made up.
Subtract: At the controller’s yield point in each cycle during the transition, the transition manager computes the local zero difference as described above. Then the Subtract method logic subtracts time from each of the phase splits for the upcoming cycle, where the total amount of time subtracted does not violate the maximum percent of cycle length specified. The amount of time subtracted from each phase is based on its percentage of the cycle length in the new plan, subject to the phase minimum split. The minimum split for a phase is calculated as the sum of its yellow change interval, red clearance interval and the maximum of its: minimum green, pedestrian timing, and maximum initial interval. In some cases where the amount subtracted from a phase is limited due to its minimum split, additional time can be subtracted from other phases that have not been limited, subject to no phase being reduced by more than the specified percentage. Finally, if the local zero difference cannot be made up in one cycle, the Subtract method logic continues to subtract time from each phase over multiple cycles until the difference is made up.
2 CORSIM can model the delay to turning vehicles due to pedestrian traffic. It is coded on an approach link to an intersection. The actuated controller pedestrian demand and the vehicle delay are not coordinated in any way. They are requested separately and operate independently. Both should be specified when modeling pedestrians at actuated controlled intersections