Operations Benefit/Cost Analysis TOPS-BC User's Manual – Providing Guidance to Practitioners in the Analysis of Benefits and Costs of Management and Operations Projects
Chapter 7. Customizing and Maintaining TOPS-BC
Overview
TOPS-BC provides a framework for analysis that is adaptable to many analysis needs. It is not designed to be a rigid, inflexible tool that forces users to follow the default methodology or input data according to a formally prescribed format. Instead, TOPS-BC has been developed in an open format to encourage practitioners or researchers (anyone with a reasonably firm understanding of spreadsheet analysis) to customize the tool to their individual needs and improve the tool as more and better data become available.
Consistent with this objective, many of the analyses conducted by TOPS-BC are structured in a manner that allow you to easily modify the tool – adding rows or columns to the structure to add in new analysis methods and data, or simply making minor modifications to existing formulas. Further, knowing that you may want to configure the tool to your region’s needs by incorporating your local data, and knowing that more data and new strategies may need to be added to the tool over time to maintain the usefulness of the tool, TOPS-BC has been developed with a number of innovative automated processes for updating and modifying the tool.
This Chapter highlights several of these customization and maintenance capabilities, including:
- Adding new rows to a spreadsheet;
- Adding new data or strategies to the Impact Look Up capability;
- Adding new capabilities or tools to the Methodology Mapping capability;
- Modifying equipment or adding new strategies to the Cost Estimation capability; and
- Adding new strategies to the Benefit Estimation capability.
Adding New Rows to a Spreadsheet
In order to customize TOPS-BC to individual situations, you may have the need to add rows to particular worksheets to add new cost elements or enhance benefit estimation capabilities. Rows may be added to any of the individual cost estimation and benefit estimation sheets for the various presented strategies.
When inserting a row into a sheet, it is important to always insert a complete row, not a partial one, by highlighting the row by clicking on the row number on the far left of the screen, performing a right mouse click and selecting “Insert.” After one or more rows are added, the Navigation Menu will temporarily contain a gap showing blanks where the new rows were inserted. However, the Navigation Menu will automatically correct itself to the new configuration once you visit another worksheet and then return to the modified sheet. This feature keeps the Navigation Menu identical across all of the worksheets.
Note that if you are inserting rows in a cost estimation sheet to add new equipment, additional processes may be required as detailed in a subsequent section and also in Chapter 5.
Adding New Data or Strategies to the Impact Look Up Capability
New data on the impacts and benefits of TSM&O strategies is constantly emerging as more agencies deploy and evaluate these strategies and as new technologies are tested and implemented. Likewise, new strategies are constantly emerging. Therefore, there is the likely need to be able to update the impact data and the strategies that are included in the Impact Look Up capability to ensure the information does not become stale.
Automated capabilities have been provided within TOPS-BC to easily update and maintain this data within the tool. These capabilities may be used to simply update the tool with new data points, add a new strategy, or to wholesale reconfigure the data look up to customize the capability to your agency’s needs (i.e., only include selected data which your agency is interested). The capability to update the impact database is provided on a hidden worksheet titled “ImpactData,” as shown in Figure 7-1. You can access the ImpactData worksheet by right-clicking on any worksheet tab, selecting “unhide” and then selecting “ImpactData” from the list of hidden worksheets.
Figure 7-1. Partial Screen View of the ImpactData Worksheet
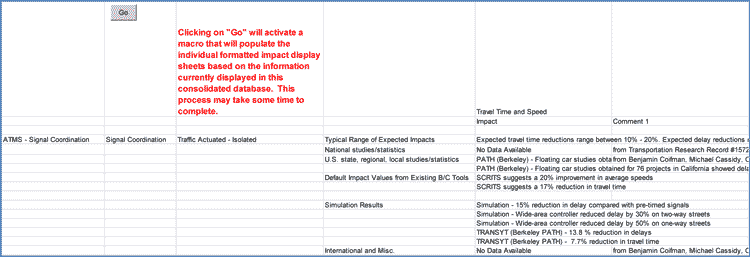
Source: Federal Highway Administration.
Information on the ImpactData worksheet drives the structure and provides the data available for the Impact Look Up capabilities provided by TOPS-BC. Columns A-C in the body of the worksheet define the name and sophistication of strategies to be included in the look up capabilities. Column A provides the highest level identification of the strategy. Any strategy named in Column A will have a separate look up worksheet created to organize impact data regarding this category. If data is present in Columns B-C, additional subcategories or levels of sophistication will be listed for the strategy in the pull-down strategy menu shown on the IMPACT LOOKUP worksheet, as illustrated in Figure 7-2.
Figure 7-2. Pull Down Menus on the IMPACT LOOKUP Worksheet
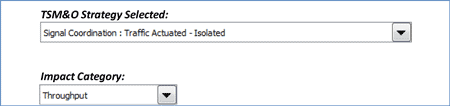
Source: Federal Highway Administration.
Column E in the ImpactData worksheet provides the opportunity to categorize the impact data according to the source or type of data (e.g., National versus international results). By default, consistent categories are used for all strategies, regardless of whether there is data available to support that category. You are free, however, to delete or add categories according to your needs and available data. All data listed to the right of Column E on the ImpactData worksheet represents the impact data organized according to impact category. Every third column represents the name of an Impact Category that will be displayed in the pull-down menu on the IMPACT LOOKUP worksheet as shown in Figure 7-2. Two Comment columns are provided to the right of each Impact Category column to provide you the opportunity to add reference data on the source of the impact information and/or other useful information.
Data is entered in rows on the ImpactData worksheet. If you wish to add new impact data regarding a particular strategy, you should first check to see if an existing empty cell exists in the target location for the data. If yes you should enter the information in the target location. If no, you should:
- Add an entire row of data to the worksheet under the appropriate strategy heading;
- Enter the impact data under the appropriate impact category;
- Enter any relevant source or reference data in the comments column immediately to the right of the newly added data; and
- Leave other cells in the row empty (TOPS-BC will ignore empty cells in this database).
When all data in the ImpactData worksheet has been modified, you should select the “Go” button located at the top of Column B, which will activate a macro to update TOPS-BC with the new data. Note: this activity may take some time to complete. The macro will update the pull-down menus on the IMPACT LOOKUP worksheet according to any changes made in the data on the ImpactData worksheet. Further, this macro will format the data into individual strategy impact worksheets according to the strategy categories supplied. The formatting of the individual strategy worksheets is based on another hidden worksheet titled “ImpactTemplate.” Any changes made to this ImpactTemplate worksheet will modify the format in which the data is organized on the individual worksheets.
Adding New Capabilities or Tools to the Methodology Mapping Capability
TOPS-BC provides the capability to map different B/C methodologies to an organization’s needs. This capability is based on a list of existing methodologies along with information regarding the appropriateness of each methodology in addressing several potential criteria regarding B/C analysis. Over time, the capabilities of the existing tools are likely to change, new tools and methods may come on-line, and even the criterion that defines which tools are most appropriate may change. TOPS-BC has several automated features to adjust to these future changes and keep the tool up to date.
Data driving the methodology mapping capability is provided on a hidden worksheet titled “MethodData” as partially shown in Figure 7-3.
Figure 7-3. Partial Screen View of the MethodData Worksheet
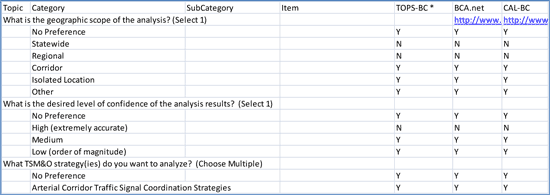
Source: Federal Highway Administration.
The data on this worksheet is generally organized with the various analysis criteria presented across the vertical axis (rows) and the available methodologies listed across the horizontal axis (columns). Column A titled “Topic” presents the questions that will be asked regarding the analysis needs. Entries listed in Column B (Category) in subsequent rows form the multiple choice answers that will be associated with each “Topic” question. You may modify both the “Topic” questions and the “Category” answers may to customize the analysis to your needs.
Within the entry for each “Topic” question, one of two specific phrases, presented in parenthesis, is required to instruct TOPS-BC how to collect data on the question from the user. These phrases include:
- (Select 1) presented as radio buttons (allowing only one selection to be made at a time; or,
- (Choose Multiple) presented as multiple selection allowing the user to select any number of answers simultaneously.
The available analysis tools and methods are arranged in columns starting in Column E. Note that by default, tools listed further to the left will be listed first when the prioritized lists are displayed. For each tool, the first row of data presents the tool name as it will appear on the METHOD SELECTION worksheet lists. The second row of data presents a web link for the tool. If no web link is available, this cell may be left blank. The remaining rows of data under an individual tool provide a yes (Y) or no (N) response to whether that tool meets the specific criteria presented in that row. If capabilities are added to a particular tool in the future, you may easily reflect this change by modifying the Y or N entry in any given cell.
You may modify the criteria (“Topic” questions asked) or modify the list of available tools simply by adding the appropriate information to complete the mapping within the matrix. This information is automatically updated to the METHOD SELECTION worksheet each time that particular worksheet is accessed.
Modifying Equipment or Adding New Strategies to the Cost Estimation Capability
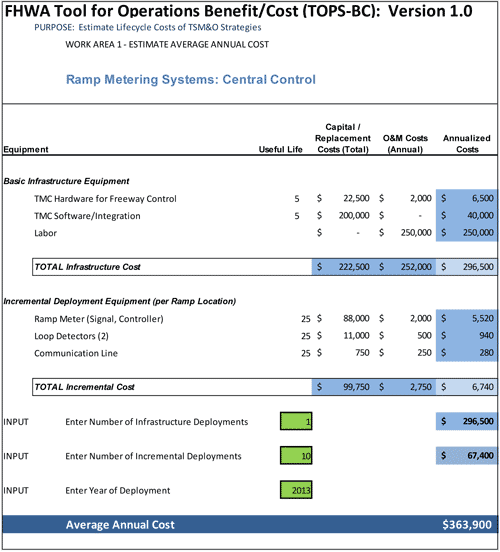
The COST ESTIMATION worksheet provides the gateway to the individual cost estimation sheets related to individual TSM&O strategies. The life-cycle cost estimation analysis is driven off default assumptions regarding:
- Equipment packages associated with each strategy;
- Unit costs of capital and O&M costs associated with each piece of equipment; and
- Useful life expectancy of each piece of equipment.
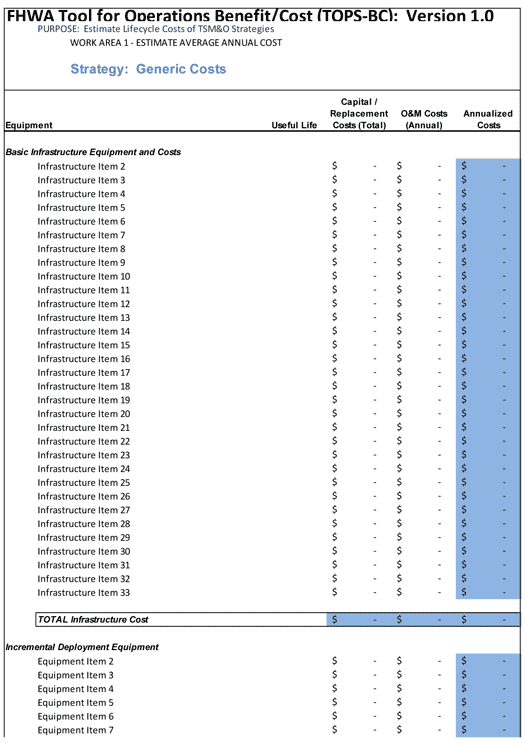
These default data, as illustrated in Figure 7-4, are generally based on national level averages and assumptions. Therefore, you may wish to configure these cost items to your region’s practices and experiences. TOPS-BC has been developed to support and encourage this customization.
Within the individual cost estimation worksheets associated with given strategies, you may modify the unit cost figures or the useful life associated with any particular piece of equipment. You may also delete pieces of equipment or add pieces of equipment to better match your own anticipated equipment mix for the strategy.
Note that if an additional row(s) is needed in order to add a new piece of equipment, you should insert an entire row by first copying an existing row of data. You can do this by highlighting an entire row by clicking on the row number at the far left of the page, conducting a right click, and selecting “Copy.” Right click on the highlighted row number again and select “Insert Copied Cells.” This will create a new row that is properly formatted and contains the cell formulas necessary to maintain the integrity of the analysis. (If you simply decide to “Insert” a new row, you will need to manually merge cells and copy/paste formulas to match the existing equipment rows.) If you are only interested in using the Average Annual Costs in your calculations, no further modifications are needed. If you are interested in viewing the Stream of Costs and calculating the Net Present Costs and Net Present Benefit, you will additionally need to check and see if the added equipment has been added to the Working Calculations Sheet at the bottom of the individual cost estimation sheet [Figure 5-4]. In some cases, due to the manner in which the row was added or the version of Excel being used, the added equipment may not have automatically been generated in the Working Calculations Sheet. Therefore, it is recommended that you check to see that the equipment has been added to the Working Calculations Sheet. If the new equipment is not there, simply follow the directions above for copying and inserting copied rows within the appropriate section of the Working Calculations Sheet to replicate the addition of the new equipment in this Working Calculations Sheet. (Again, you should first copy and “Insert Copied Cells” to ensure the formatting and calculations are maintained.)
As rows are added, the Navigation Menu will temporarily be distorted as gaps will appear in the content; however, once you leave the page where the rows have been added and then return, the Navigation Menu will once again correctly display.
When changing data, note that any modification to the default data requires that the modified data match the data format of the default data. For example, you may enter a new piece of equipment for a particular strategy; however, it must have supporting data on the useful life, capital cost, and annual O&M cost to work within TOPS-BC’s estimation structure.
Figure 7-4. Sample Screen View of a Cost Estimation Worksheet
Source: Federal Highway Administration.
Further, TOPS-BC maintains a blank cost estimation worksheet that you may use to create cost estimation capabilities for new strategies that may not currently be included. A blank cost estimation worksheet is provided as a hidden sheet titled COST TEMPLATE, shown as Figure 7-5. This worksheet has all the analysis capabilities present in all other strategy worksheets, but lacks any default equipment or cost data. You may copy the data in this worksheet in its entirety and paste it into a new worksheet. This new worksheet may then be renamed and populated with your customized defined equipment and cost data to create new strategies, assuming that the new data is entered in the same format (e.g., equipment name, capital cost, useful life, annual O&M costs). Unneeded rows may be deleted. You will need to manually modify the navigation capabilities and link the new worksheet to the SUMMARY sheet or other worksheets where they intend to use the output cost data.
Figure 7-5. Partial Screen View of the Blank COST TEMPLATE Worksheet
Source: Federal Highway Administration.
Adding New Strategies to the Benefit Estimation Capability
Similar to the addition of a new strategy within the Cost Estimation capability described in the previous section, you may add new worksheets to provide the ability to analyze new strategies by copying an existing worksheet. You are given two options for creating a new strategy: 1) you may carefully review and consider the various strategies that are available, and select one to copy that most closely resembles the analysis capabilities desired for the new strategy; or 2) you may create a new strategy from the Generic Link Model worksheet that contains many common analysis methodologies for link based analyses, as well as the Navigation Menu, pre-incorporated into the worksheet. Figure 7-6 shows a partial view of the Generic Link Model sheet.
Figure 7-6. Partial View of Generic Link Model Sheet
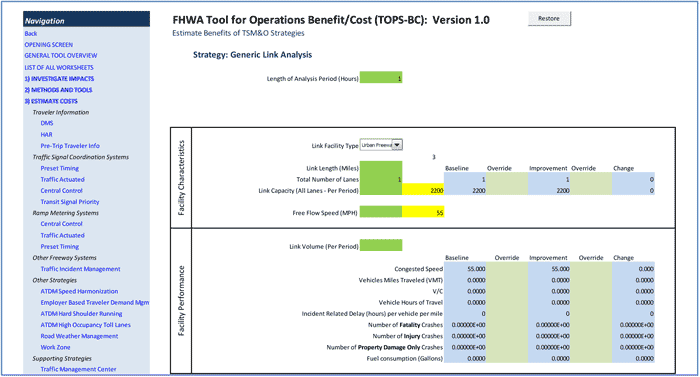
Source: Federal Highway Administration.
To create a new strategy, you should follow these steps;
- Navigate to the Generic Link Model worksheet (or other specific strategy worksheet);
- Perform a right mouse click on the tab for the sheet to be copied;
- Select “Move or Copy” from the pop-up menu;
- A second pop-up menu will appear;
- Select the “Create a copy” box at the bottom of the menu;
- Select a location to place the sheet in the tool by indicating which existing sheet the copy should be placed before (note this location should be after the BENEFIT ESTIMATE sheet and before the SUMMARY OF MY DEPLOYMENTS sheet);
- Rename the new copy of the worksheet with a unique name on that worksheet’s tab;
- Change the name of the strategy contained in cell J5.
Once the generic (or other) sheet has been copied and renamed, you may add or modify default values to the copied worksheet and delete rows of data or impact measures not needed for the analysis if desired.
In these situations, it is your responsibility to configure and modify the new strategy worksheet to provide the analysis capabilities and impact data appropriate to the strategy being evaluated. You will also need to modify the navigation links (see description of this process in the subsequent section) and links to the SUMMARY and cost estimation worksheets if you want to share this information with these other sheets.
Modifying the Navigation Menu
As noted in previous descriptions of capabilities, TOPS-BC maintains a common Navigation Menu that is used on nearly all sheets in the workbook. This Navigation Menu automatically regenerates on each page when the sheet is opened; therefore, it can not be directly edited on the individual sheets as any changes would be overwritten the next time the sheet is opened.
It is recommended that the modification of the Navigation Menu be performed by users with a firm understanding of Excel and spreadsheet functions, as changes made to the menu will impact all sheets in the tool.
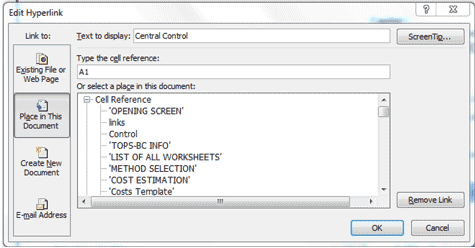
The Master Navigation Menu is maintained on a hidden worksheet named “links.” To modify the menu, you should unhide and navigate to this sheet. The Navigation Menu is displayed along the left hand side similar to other worksheets, except that the menu is divided into two sections, with many of the benefit estimation worksheets listed in a separated section shown below the initial menu listings. New strategy worksheets can be added to the Navigation Menu by inserting an entire row in the desired location and entering the desired name of the worksheet. You will then need to create a hyperlink for the new entry by performing a right mouse click in the cell for the new entry and selecting “Hyperlinks” from the pop-up menu. You should ensure that “Place in this document” option is selected in the “Link to” setting box as Shown in Figure 7-7. You then select the name of the worksheet from the list of worksheets shown near the top of the “Or select a place in this document:”box, and then click “OK.”
Figure 7-7. Creating a New Hyperlink in the Master Navigation Menu
Source: Federal Highway Administration.
These actions will modify the Navigation Menu that is presented on all sheets simultaneously. It is recommended that you hide the “links” sheet following modification to the menu to avoid unintended editing of the Master Navigation Menu.
Restore Feature
As recommended in Chapter 2, you are encouraged to download the latest version of the spreadsheet file and save it to the hard drive on their computer. You are subsequently encouraged to make a copy of the file and rename it according to your own file keeping structure. You should then use the copied file as you move forward with your analysis. This will ensure that a “clean” copy of the file is preserved in case you wish to use it as a reference.
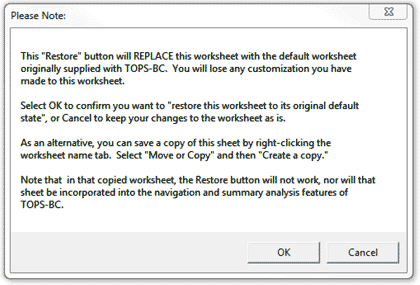
However, there may be an instance when you would like to reset a particular worksheet back to the original default settings and conditions. This function has been built into select worksheets and is accessible via a gray “Restore” button at the top right of the worksheet. The following worksheets have this capability: the Estimate Costs worksheets for each of the individual strategies, the Estimate Benefits worksheets for each of the individual strategies, the Parameters worksheet, and the My Deployments worksheet.
When used, the “Restore” feature will completely replace the active worksheet with its default worksheet that was originally supplied within TOPS-BC Version 1.0. Any customization you have made to that worksheet will be lost. As this function cannot be undone, a pop-up window is provided with a warning message, as shown in Figure 7-8. Before using the Restore feature, you can create a copy of the worksheet to save it for future reference. This can be accomplished by right-clicking the worksheet name tab, selecting “Move or Copy” and then “Create a copy.” Note that the Restore button in the copied worksheet will not work, nor will that copied sheet be incorporated into the navigation and summary analysis features of the tool.
The Restore button is not intended for frequent use, but rather serves as a safety function should you wish to undo changes they made to a worksheet. Again, it is always recommended that a new file be created from the preserved “clean” copy when you plan to begin a new analysis scenario.
Figure 7-8. Restore Feature Pop-up Message
Source: Federal Highway Administration.