Office of Operations Freight Management and Operations

Cross-town Improvement Project Evaluation

Appendix A. RTTM/DRG Intermodal Lanes and Route Maps

A.1 RTTM Maps

Figure A.1.a Primary and Alternate Routes by Lane
Lane 1, Primary, ITS, BNSF to NS, 19 miles, 32 minutes

Map - Figure A.1.a is a map showing Real-Time Traffic Monitoring of the primary route for Lane 1, ITS, BNSF to NS.

Figure A.1.b Primary and Alternate Routes by Lane
Lane 7, Primary, IXT, BNSF to Muscian’s Friend, 21 miles, 33 minutes

Map - Figure A.1.b is a map showing Real-Time Traffic Monitoring of the primary route for Lane 7, IXT, BNSF to Muscian’s Friend.

Figure A.1.c Primary and Alternate Routes by Lane
Lane 7, Alternate, IXT, BNSF to Muscian’s Friend, 20 miles, 30 minutes

Map - Figure A.1.c is a map showing Real-Time Traffic Monitoring of an alternate route for Lane 7, IXT, BNSF to Muscian’s Friend.

Figure A.1.d Primary and Alternate Routes by Lane
Lane 7, Alternate, IXT, BNSF to Muscian’s Friend, 22 miles, 32 minutes

Map - Figure A.1.d is a map showing Real-Time Traffic Monitoring of an alternate route for Lane 7, IXT, BNSF to Muscian’s Friend.

Figure A.1.e Primary and Alternate Routes by Lane
Lane 9, Primary, Comtrak, Toyota to Grainger, 25 miles, 30 minutes

Map - Figure A.1.e is a map showing Real-Time Traffic Monitoring of the primary route for Lane 9, Comtrak, Toyota to Grainger.

Figure A.1.f Primary and Alternate Routes by Lane
Lane 9, Alternate, Comtrak, Toyota to Grainger, 23 miles, 28 minutes

Map - Figure A.1.f is a map showing Real-Time Traffic Monitoring of an alternate route for Lane 9, Comtrak, Toyota to Grainger.

Figure A.1.g Primary and Alternate Routes by Lane
Lane 9, Alternate, Comtrak, Toyota to Grainger, 22 miles, 29 minutes

Map - Figure A.1.g is a map showing Real-Time Traffic Monitoring of an alternate route for Lane 9, Comtrak, Toyota to Grainger.

Figure A.1.h Primary and Alternate Routes by Lane
Lane 10, Primary, Comtrak, UP to Toyota, 25 miles, 31 minutes

Map - Figure A.1.h is a map showing Real-Time Traffic Monitoring of the primary route for Lane 10, Comtrak, Up to Toyota.

Figure A.1.i Primary and Alternate Routes by Lane
Lane 10, Alternate, Comtrak, UP to Toyota, 23 miles, 27 minutes

Map - Figure A.1.i is a map showing Real-Time Traffic Monitoring of an alternate route for Lane 10, Comtrak, Up to Toyota.

Figure A.1.j Primary and Alternate Routes by Lane
Lane 10, Alternate, Comtrak, UP to Toyota, 19 miles, 25 minutes

Map - Figure A.1.j is a map showing Real-Time Traffic Monitoring of an alternate route for Lane 10, Comtrak, Up to Toyota.

Figure A.1.k Primary and Alternate Routes by Lane
Lane 11, Primary, Comtrak, BNSF to Topeka, 59 miles, 60 minutes

Map - Figure A.1.k is a map showing Real-Time Traffic Monitoring of the primary route for Lane 10, Comtrak, BNSF to Topeka.

A.2 DRG Maps

In the following maps, the red dots indicate the point of DRG redirect for each trip. The upper left corner of each map contains a unique identification number for each trip.

Figure A.2.a Toyota to Grainger
C10 - Comtrak

Map - Figure A.2.a is a map depicting Dynamic Route Guidance redirects on the Toyota to Grainger route showing the C10 - Comtrak trip. The red dot is the point of Dynamic Route Guidance redirect.

Figure A.2.b Toyota to Grainger
C15 - Comtrak

Map - Figure A.2.b is a map depicting Dynamic Route Guidance redirects on the Toyota to Grainger route showing the C15 - Comtrak trip. The red dot is the point of Dynamic Route Guidance redirect.

Figure A.2.c Toyota to Grainger
C18 - Comtrak

Map - Figure A.2.c is a map depicting Dynamic Route Guidance redirects on the Toyota to Grainger route showing the C18 - Comtrak trip. The red dot is the point of Dynamic Route Guidance redirect.

Figure A.2.d Toyota to Grainger
C21 - Comtrak

Map - Figure A.2.d is a map depicting Dynamic Route Guidance redirects on the Toyota to Grainger route showing the C21 - Comtrak trip. The red dot is the point of Dynamic Route Guidance redirect.

Figure A.2.e Toyota to Grainger
C25 - Comtrak

Map - Figure A.2.e is a map depicting Dynamic Route Guidance redirects on the Toyota to Grainger route showing the C25 - Comtrak trip. The red dot is the point of Dynamic Route Guidance redirect.

Figure A.2.f Toyota to Grainger
C30 - Comtrak

Map - Figure A.2.f is a map depicting Dynamic Route Guidance redirects on the Toyota to Grainger route showing the C30 - Comtrak trip. The red dot is the point of Dynamic Route Guidance redirect.

Figure A.2.g Toyota to Grainger
C44 - Comtrak

Map - Figure A.2.g is a map depicting Dynamic Route Guidance redirects on the Toyota to Grainger route showing the C44 - Comtrak trip. The red dot is the point of Dynamic Route Guidance redirect.

Figure A.2.h Toyota to Grainger
C52 - Comtrak

Map - Figure A.2.h is a map depicting Dynamic Route Guidance redirects on the Toyota to Grainger route showing the C52 - Comtrak trip. The red dot is the point of Dynamic Route Guidance redirect.

Figure A.2.i Toyota to Grainger
C28 - Comtrak

Map - Figure A.2.i is a map depicting Dynamic Route Guidance redirects on the Toyota to Grainger route showing the C28 - Comtrak trip. The red dot is the point of Dynamic Route Guidance redirect.

Figure A.2.j Toyota to Grainger
C35 - Comtrak

Map - Figure A.2.j is a map depicting Dynamic Route Guidance redirects on the Toyota to Grainger route showing the C35 - Comtrak trip. The red dot is the point of Dynamic Route Guidance redirect.

Figure A.2.k Toyota to Grainger
C39 - Comtrak

Map - Figure A.2.k is a map depicting Dynamic Route Guidance redirects on the Toyota to Grainger route showing the C39 - Comtrak trip. The red dot is the point of Dynamic Route Guidance redirect.

Figure A.2.l Toyota to Grainger
C49 - Comtrak

Map - Figure A.2.l is a map depicting Dynamic Route Guidance redirects on the Toyota to Grainger route showing the C49 - Comtrak trip. The red dot is the point of Dynamic Route Guidance redirect.

Figure A.3.a UP to Toyota
C48 - Comtrak

Map - Figure A.3.a is a map depicting Dynamic Route Guidance redirects on the UP to Toyota route showing the C48 - Comtrak trip. The red dot is the point of Dynamic Route Guidance redirect.

Figure A.3.b UP to Toyota
C50 - Comtrak

Map - Figure A.3.b is a map depicting Dynamic Route Guidance redirects on the UP to Toyota route showing the C50 - Comtrak trip. The red dot is the point of Dynamic Route Guidance redirect.

Figure A.3.c UP to Toyota
C43 - Comtrak

Map - Figure A.3.c is a map depicting Dynamic Route Guidance redirects on the UP to Toyota route showing the C43 - Comtrak trip. The red dot is the point of Dynamic Route Guidance redirect.

Figure A.3.d UP to Toyota
C47 - Comtrak

Map - Figure A.3.d is a map depicting Dynamic Route Guidance redirects on the UP to Toyota route showing the C47 - Comtrak trip. The red dot is the point of Dynamic Route Guidance redirect.

Figure A.3.e UP to Toyota
C40 - Comtrak

Map - Figure A.3.e is a map depicting Dynamic Route Guidance redirects on the UP to Toyota route showing the C40 - Comtrak trip. The red dot is the point of Dynamic Route Guidance redirect.

Figure A.3.f UP to Toyota
C42 - Comtrak

Map - Figure A.3.f is a map depicting Dynamic Route Guidance redirects on the UP to Toyota route showing the C42 - Comtrak trip. The red dot is the point of Dynamic Route Guidance redirect.

Figure A.3.g UP to Toyota
C45 - Comtrak

Map - Figure A.3.g is a map depicting Dynamic Route Guidance redirects on the UP to Toyota route showing the C45 - Comtrak trip. The red dot is the point of Dynamic Route Guidance redirect.

Figure A.3.h UP to Toyota
C46 - Comtrak

Map - Figure A.3.h is a map depicting Dynamic Route Guidance redirects on the UP to Toyota route showing the C46 - Comtrak trip. The red dot is the point of Dynamic Route Guidance redirect.

Figure A.3.i UP to Toyota
C51 - Comtrak

Map - Figure A.3.i is a map depicting Dynamic Route Guidance redirects on the UP to Toyota route showing the C51 - Comtrak trip. The red dot is the point of Dynamic Route Guidance redirect.

Figure A.3.j UP to Toyota
C36 - Comtrak

Map - Figure A.3.j is a map depicting Dynamic Route Guidance redirects on the UP to Toyota route showing the C36 - Comtrak trip. The red dot is the point of Dynamic Route Guidance redirect.

Figure A.3.k UP to Toyota
C41 - Comtrak

Map - Figure A.3.k is a map depicting Dynamic Route Guidance redirects on the UP to Toyota route showing the C41 - Comtrak trip. The red dot is the point of Dynamic Route Guidance redirect.

Figure A.4.a BNSF to Musician’s Friend
X14 - IXT

Map - Figure A.4.a is a map depicting Dynamic Route Guidance redirects on the BNSF to Musician’s Friend route showing the X14 - IXT trip. The red dot is the point of Dynamic Route Guidance redirect.

Figure A.4.b BNSF to Musician’s Friend
X05 - IXT

Map - Figure A.4.b is a map depicting Dynamic Route Guidance redirects on the BNSF to Musician’s Friend route showing the X05 - IXT trip. The red dot is the point of Dynamic Route Guidance redirect.

Figure A.4.c BNSF to Musician’s Friend
X09 - IXT

Map - Figure A.4.c is a map depicting Dynamic Route Guidance redirects on the BNSF to Musician’s Friend route showing the X09 - IXT trip. The red dot is the point of Dynamic Route Guidance redirect.

Figure A.4.d BNSF to Musician’s Friend
X10 - IXT

Map - Figure A.4.d is a map depicting Dynamic Route Guidance redirects on the BNSF to Musician’s Friend route showing the X10 - IXT trip. The red dot is the point of Dynamic Route Guidance redirect.

Figure A.4.e BNSF to Musician’s Friend
X13 - IXT

Map - Figure A.4.e is a map depicting Dynamic Route Guidance redirects on the BNSF to Musician’s Friend route showing the X13 - IXT trip. The red dot is the point of Dynamic Route Guidance redirect.

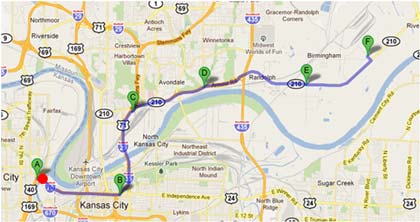
Figure A.4.f BNSF to Musician’s Friend
X16 - IXT

Map - Figure A.4.f is a map depicting Dynamic Route Guidance redirects on the BNSF to Musician’s Friend route showing the X16 - IXT trip. The red dot is the point of Dynamic Route Guidance redirect.

previous | next