United States Department of Transportation - Federal Highway Administration FHWA Home Feedback

3.0  Methodology for Selecting a Traffic Analysis Tool

The purpose of this section is to provide guidance to users on how to use the criteria presented in section 2.0 to select the appropriate analytical tool category. Worksheets are provided in this section to help users work through the process of selecting the appropriate tool for addressing the project's goals and objectives. In addition, an automated tool has been developed to implement these steps. This tool can be found on the FHWA Traffic Analysis Tools Web site at: http://ops.fhwa.dot.gov/Travel/Traffic_Analysis_Tools/traffic_analysis_toolbox.htm

3.1 Steps for Selecting the Appropriate Tool Category

This section details the recommended steps for selecting the appropriate tool category for the task. Depending on the project, more than one analytical tool may be capable of analyzing and producing the desired output. It should also be recognized that one specific tool might not be able to address all of the project's needs. Multiple tools may be desirable for conducting a particular study and those tools may or may not be from the same tool category.

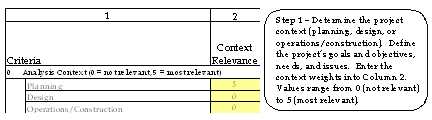
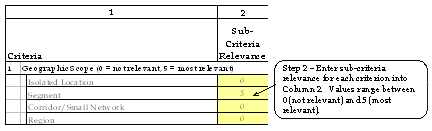
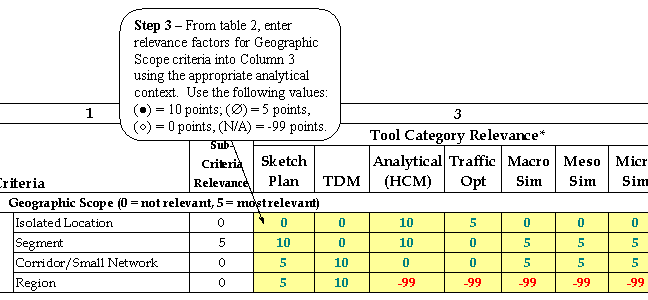
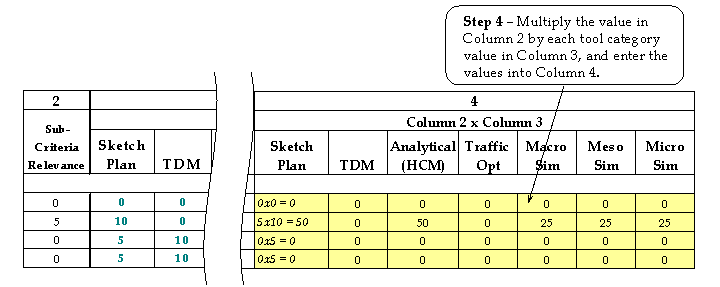
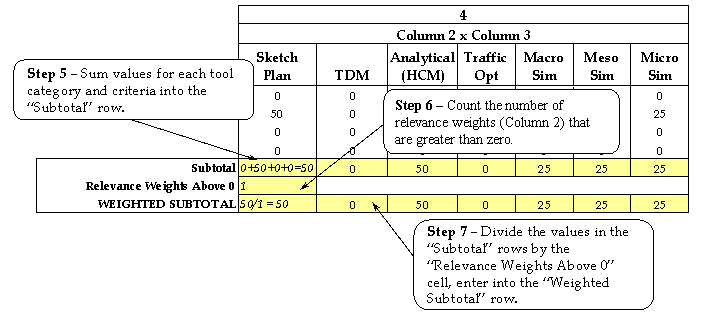
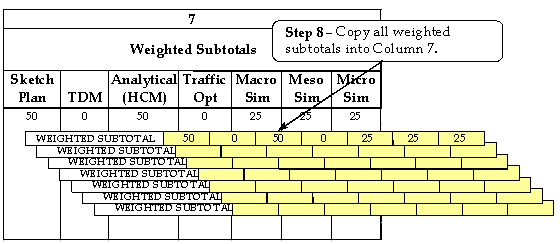
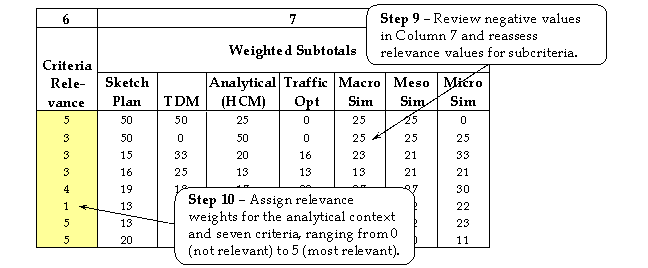
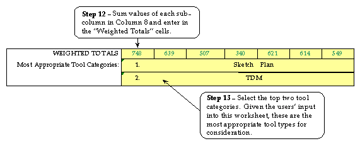
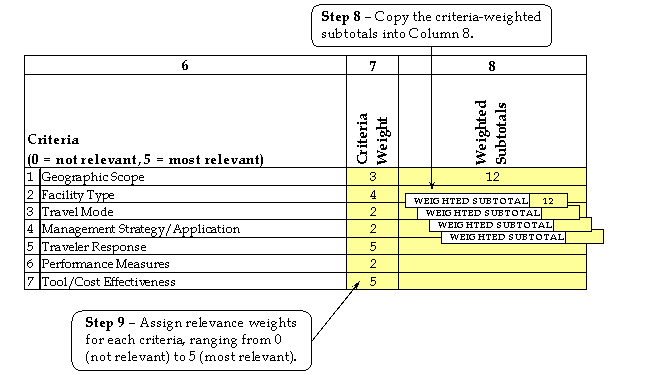
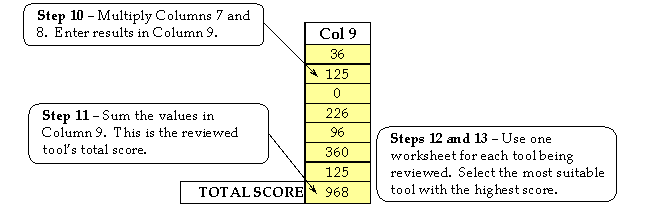
Appendix B contains a worksheet that may be used to assist with the tool category selection process. Using the steps described below, fill out the cells of Table 13:

  1. Define the context of the project and assign context relevance weights (column 2). In most cases, the most appropriate tool category or tool depends on the type of project and the level of detail required by each project context. Therefore, the first step is to carefully think about the context of the project (whether it is planning, design, or operations/construction) and the goals, objectives, issues, and needs of the project. Next, enter the analytical context relevance weight in column 2, depending on the type of study. The values entered in column 2 should range from 0 (not relevant) to 5 (most relevant). For example, if the project is a long-range plan, the context relevance weight should be 5 for "Planning" and 0 for "Design" and "Operations/Construction." For definitions of the analytical contexts, refer to section 2.1.

Figure 3.  Selecting the appropriate tool category, step 1.  Diagram.  This figure shows an excerpt from table 13 in 
	 appendix B.  Step 1 is to determine the project context (planning, design, or operations/construction).  Define the project's 
	 goals and objectives, needs, and issues.  Enter the context weights into Column 2.  Values range from 0 (not relevant) to 5 
	 (most relevant).

Figure 3. Selecting the appropriate tool category, step 1.

  1. Assign subcriteria relevance weights (column 2). In this step, the user assigns relevance weights to subcriteria within each type of criterion. Subcriteria that are highly desirable as part of the project should be given higher weights. The relevance values that should be entered in column 2 range from 0 (not relevant) to 5 (most relevant). Enter the weights for each subcriterion as they relate to each other and the needs of the project.

    Here are some examples for assigning relevance weights:
  1. Geographic Scope: If the study area consists of a 8-km-long (5-mi-long) freeway segment with two parallel arterials on each side, plus all connecting streets, a weight of 5 should be given to "Corridor/Small Network" and weights of 0 should be given to all other subcriteria.
  2. Facility Type: If the facility types in the study area are primarily a freeway, its parallel arterials, and the connecting ramps and streets, but there are also auxiliary lanes and HOV lanes and the impact on those is not as important, a weight of 5 should be given to "Freeway," "Arterial," and "Ramps," while a weight of 3 might be given to "HOV Lane" and "Auxiliary Lane." Weights of 0 would be given to the other facility-type subcriteria.
  3. Travel Mode: The project involves ramp metering and data related to SOV, HOV, and truck modes are available. However, the project focus is on the SOV mode. A weight of 5 would be given to "SOV," a 2 would be given to "HOV," a 1 would be given to "Truck," and weights of 0 would be given to the other modes.
  4. Management Strategy/Application: The project involves ramp metering only. A weight of 5 would be given to "Freeway Management" and the other subcriteria would be given weights of 0.
  5. Traveler Response: It is anticipated that there will be some route diversion as a result of ramp metering, so it should be given a high weight. There may be some mode shift or departure time choice; however, they are not nearly as relevant for the analysis. "Route Diversion" should be given a weight of 5, "Mode Shift" and "Departure Time Choice" should each be given a 2, and the other traveler responses should be given weights of 0.
  6. Performance Measures: The stakeholders for this project are interested in travel speed, volume, and the travel time changes anticipated from the ramp metering project. A benefit/cost comparison is also desired for determining whether the project is worthwhile to implement. The measures to be considered for the benefit/cost comparison include mobility (delay), travel time reliability, safety (crashes), emissions, and fuel consumption. Weights of 5 would be given to "Speed," "Volume," "Travel Time," "Delay," "Travel Time Reliability," "Crashes," "Emissions," "Fuel Consumption," and "Benefit/Cost." Many of these measures are based on VMT and VHT/PHT. Therefore, if some of the desired measures are not available, "VMT/PHT" and "VHT/PHT" measures would each be given a weight of 4. Because this is a ramp metering project, it would also be desirable to know the queue length, but it is not required, so a weight of 2 would be given to "Queue Length." The other performance measure subcriteria would be given weights of 0.
  7. Tool/Cost-Effectiveness: There is an adequate budget for addressing all aspects of the project, including the costs of acquiring the tool, staff training, hardware requirements, and analytical runs. The high priorities for the project in this area involve confidence in the results, the ability of the tool to be adjusted to local conditions, and that the results can be easily produced and presented to the stakeholders. In this case, weights of 5 would be given to "Popular/Well Trusted," "Post-Processing Requirements," "Key Parameters Can Be User-Defined," and "Animation/Presentation Features." Weights of 3 would be given to "Easy to Use," "Data Requirements," and "Default Values Are Provided." Weights of 2 would be given to "Low Tool Costs," "Level of Effort/Training," "Documentation," and "User Support." In addition, a weight of 1 would be given to "Hardware Requirements." "Integration With Other Software" is not a concern and would be given a weight of 0.

Figure 4.  Selecting the appropriate tool category, step 2.  Diagram.  This figure shows an excerpt from table 13 in appendix B.  
	 Step 2 is to enter the subcriteria relevance for each criterion into Column 2.  Values range between 0 (not relevant) and 5 
	 (most relevant).

Figure 4. Selecting the appropriate tool category, step 2.

  1. Assign tool relevance values (column 3). Most of these values are provided as part of the worksheet (Appendix B) based on the assessment presented in Tables 1 through 8. Only the geographic scope criterion requires user input of tool relevance values in column 3. Using the appropriate analytical context and the tool relevance factors presented in Table 2, enter the tool relevance values for "Geographic Scope" in column 3:
  1. For every solid circle (for every solid circle assign a value of 10), assign a value of 10.
  2. For every null symbol (for every null symbol assign a value of 5), assign a value of 5.
  3. For every empty circle (for every empty circle assign a value of 0), assign a value of 0.
  4. For every not applicable (N/A), assign a value of -99.

Figure 5.  Selecting the appropriate tool category, step 3.  Diagram.  This figure shows an excerpt from table 13 in appendix B.  
	 Step 3 is to enter relevance factors for Geographic Scope criteria from Column 2 into Column 3, using the appropriate analytical 
	 context.

Figure 5. Selecting the appropriate tool category, step 3.

  1. Multiply columns 2 and 3 (column 4). For the analytical context and each subcriterion, multiply the entries in column 2 by the entries in each subcolumn in column 3, and enter the products into the appropriate cells in column 4.

Figure 6.  Selecting the appropriate tool category, step 4.  Diagram.  This figure shows an excerpt from table 13 in appendix B.  
	 Step 4 is to multiply the value in Column 2 with each tool category value in Column 3, and enter the values into Column 4.

Figure 6. Selecting the appropriate tool category, step 4.


  1. Sum the values of column 4. For the analytical context and each criterion, add up the values for each tool category in column 4 and enter the result into the "Subtotal" row in column 4.
  2. Count the number of subcriteria relevance weights greater than 0. For the analytical context and each criterion, count the number of relevance weights in column 2 that are greater than 0 and enter the value into the "Relevance Weights Above 0" cell.
  3. Calculate the criteria ratings. Divide the values in the "Subtotal" rows by the number of "Relevance Weights Above 0" cell and enter the amount into the "Weighted Subtotal" row in order to normalize the scores. Repeat this process for each criterion.

Figure 7.  Selecting the appropriate tool category, steps 5-7.  Diagram.  This figure shows an excerpt from table 13 in appendix B.  
	 Step 5 is to sum the values for each tool category and criteria into the Subtotal row.  Step 6 is to count the number of relevance 
	 weights (Column 2) that are greater than zero.  Step 7 is to divide the valued in the Subtotal rows by the Relevance Weights Above 0 
	 cell, enter into the Weighted Subtotal row.

Figure 7. Selecting the appropriate tool category, steps 5-7.

  1. Group weighted subtotals (column 7). Copy the weighted subtotals for the analytical context and seven criteria from their respective rows to column 7 at the bottom of the worksheet.

Figure 8.  Selecting the appropriate tool category, step 8.  Diagram.  This figure shows an excerpt from table 13 in appendix B.  
	 Step 8 is to copy all weighted subtotals into Column 7.

Figure 8. Selecting the appropriate tool category, step 8.

  1. Review and reassess weighted subtotals. Review the values in column 7 for each criterion and tool category, with particular focus on the negative values. For each negative criteria value, identify the source of the negative value (column 4) and verify the subcriteria relevance in column 2. Make adjustments as necessary to the subcriteria relevance values based on the project's goals and objectives, priorities, needs, and issues.
  2. Assign criteria relevance weights (column 6). The prior weighting scheme (column 2) was applied to the subcriteria within each major criteria category. This step involves weighting the major criteria categories against each other. This should be based on the project's goals and objectives, priorities, needs, and issues. For the analytical context and each of the seven criteria, assign the appropriate weights, ranging from 0 (not relevant) to 5 (most relevant). If a user wants to weight each of the criteria and analytical context equally, a weight of 5 can be applied to all. A different weighting scheme may be used if greater differentiations between criteria are necessary. The user should carefully consider the project's priorities, needs, and constraints when selecting the criteria weights.

Figure 9.  Selecting the appropriate tool category, steps 9 and 10.  Diagram.  This figure shows an excerpt from table 13 in 
	 appendix B.  Step 9 is to review negative values in Column 7 and reassess relevance values for subcriteria.  Step 10 is to assign 
	 relevance weights for the analytical context and seven criteria, ranging from 0 (not relevant) to 5 (most relevant).

Figure 9. Selecting the appropriate tool category, steps 9 and 10.

  1. Multiply columns 6 and 7 (column 8). For each context/criterion, multiply the value in column 6 by each of the subcolumns in column 7 and enter the result into the appropriate cells in column 8.

Figure 10.  Selecting the appropriate tool category, step 11.  Diagram.  This figure shows an excerpt from table 13 in appendix B.  
	 Step 11 is to multiply the value in Column 6 by Column 7 for each tool category, and enter the values in Column 8.

Figure 10. Selecting the appropriate tool category, step 11.

  1. Determine the best tool categories. Sum the products of the multiplication for each tool category in column 8 and enter the values in the "Weighted Totals" row at the bottom of the worksheet. The tool categories with the highest totals based on this mathematical process are the most appropriate tools for the task.

Figure 11.  Selecting the appropriate tool category, steps 12 and 13.  Diagram.  This figure shows an excerpt from table 13 in 
	 appendix B.  Step 12 is to sum the values of each subcolumn in Column 8 and enter in the Weighted Totals cells.  Step 13 is to select 
	 the top two tool categories.  Given the users' input into this worksheet, these are the most appropriate tool types for consideration.

Figure 11. Selecting the appropriate tool category, steps 12 and 13.

  1. Select the top two tool categories for further consideration. It is recommended that the user further explore the available tools for the top two most appropriate tool categories, particularly if the total scores are close in value. Tool categories with final scores of less than 0 should not be considered. It should be recognized that one specific tool may not be able to address all of the project's needs. Multiple tools may be necessary for conducting a particular study and those tools may or may not be from the same tool category. Each of the subcriteria with high relevance factors and low scores in column 4 will need to be assessed to determine if that particular category of tool weakness can be overcome through other means (e.g., there is a need for microsimulation; however, the computer resources are insufficient to accommodate the analytical needs).

3.2 Examples for Using the Tool Category Selection Worksheets

The following are three examples for using the tool category selection worksheets.

3.2.1 Example 1: Ramp Metering Corridor Study

A State department of transportation (DOT) needs to assess the future impact of ramp metering. Without the convenience of a field experiment, the DOT must estimate the volume, speed, and travel time impacts of ramp metering on a freeway corridor, the ramps, and the parallel arterials. The study corridor is approximately 24 km long (15 mi long), running north-south, with one parallel arterial on each side of the freeway less than 0.8 km (0.5 mi) away. The impact of passenger cars is the focus of the study for both the SOV and HOV travel modes. Ramp metering strategies to be considered include fixed-time and adaptive ramp metering, with the following parameter permutations: (1) with and without queue control, (2) with and without HOV bypass lanes, and (3) restrictive and less restrictive metering rates. Since ramp metering may cause diversion of traffic to the parallel arterials, the ability of the traffic analysis tool to adapt to dynamic traffic conditions is crucial to the project. In addition, the corridor is currently undergoing major infrastructure changes. HOV lanes are being constructed at the southern portion of the corridor and a few interchanges are being realigned.

The project manager has stressed that deployment of ramp meters at this corridor will not occur without the support of the local city partners. The State DOT and the local traffic jurisdictions have developed excellent working relationships over the years; however, the cities are reluctant to support the ramp metering project because they fear that the traffic queues at the on-ramps and route diversion would reduce the performance of their arterials. Therefore, an objective of the evaluation is to select the ramp metering strategy that can be accepted by all stakeholders. The ability of the tool to produce animated results is preferred, but is not crucial; however, the tool must be well accepted and widely used.

The project team consists of experienced analysts and engineers who are equipped with high-performance computers. The State has obtained the arterial/interchange signal timings from the local cities in preparation for this project. Old aerial photographs showing the corridor before construction work and design drawings from the construction sites are available.

Project Assessment

Based on the information provided, the following can be used to summarize the project:

Tool Category Selection Worksheet for Example 1

Table 9 shows a completed worksheet for this example. Based on the analysis performed using the worksheet, this project can be best evaluated using three different tool categories (there are only two negative final scores, while three of seven scores are close). The most appropriate tool category is the microscopic simulation tools, followed by macroscopic and mesoscopic simulation tools.

3.2.2 Example 2: ITS Long-Range Plan

A metropolitan planning organization (MPO) plans to assess the future costs and benefits of ITS investments in its jurisdiction. The study area is the entire metropolitan area, which is about 1300 km2 (500 mi2); however, the MPO is only concerned about travel on freeways, highways, and major arterials.

A skeleton network with nodes, links, and trip table data is available from the local travel demand model. Aerial photographs are available. However, they are a few years old, but the major transportation infrastructure has not changed and no changes are expected in the future. Alternative modes of transportation (e.g., transit, motorcycles, trucks, and light rail) are important; however, the focus of the study is the impact on passenger cars. The ITS strategies to be considered include ramp metering, incident management, arterial management, and advanced traveler information systems (ATIS). The MPO has developed O-D trip tables for both existing and future scenarios. At least five different alternatives will need to be analyzed. As for the output, the MPO Board is mostly concerned with the benefit/cost ratios related to each of the ITS alternatives. If necessary, a second tool may be used to convert the output into monetary terms.

The project manager is an experienced modeler who has worked with demand forecasting tools in the past, but most of her team members are relatively new to the field. However, the team members are computer-savvy and seem to absorb new ideas extremely well, given the availability of learning resources. This project has a healthy budget; however, time is of the essence, since the board needs to submit a report to the finance department by the end of the fiscal year, which is only 6 months away.

Project Assessment

Based on the information provided, the following can be used to summarize the project:

Tool Category Selection Worksheet for Example 2

The completed worksheet for this example is shown in Table 10. Criteria and subcriteria weights that address the project's goals and objectives were given higher values. Based on the analysis performed for this example, the most appropriate tool category is the travel demand model. The sketch-planning tool category should also be considered since the scores are reasonably close. The user should further explore the specific tools that fall within these two categories to determine which tool(s) best serves the needs of the project. Other tool categories in this example have scores of less than 0 and should not be considered for analysis.

3.2.3 Example 3: Arterial Signal Coordination and Preemption

A city traffic department is conducting a major traffic signal timing improvement on one of its most critical arterials, which is about 16 km long (10 mi long). This study is being conducted in conjunction with a large redevelopment project that hopes to revive the economy in this section of town. Multiple interest groups, neighborhood groups, and city jurisdictions are involved with the project.

The arterial is vital to the city and currently serves all travel modes; however, the city is most interested in improving travel on the arterial for passenger vehicles, buses, and light rail, primarily through the use of signal coordination. No major alignment changes are being considered; however, traffic signal preemption for buses and light rail is a major component that will be introduced for the first time in this city. Many citizens are not familiar with the technology and are quite skeptical about its effectiveness. In fact, many perceive that preemption would result in worse traffic conditions. Therefore, an evaluation process and an outreach program highlighting the benefits of the project to the community are needed. The results of the analysis must be presented to the public and the stakeholders in the most effective manner.

The best and most experienced staff members have been assigned to this project. They are experts in a few modeling and simulation tools, but are looking for the best tool available with a short and flat learning curve. Otherwise, they are more inclined to use the tools that they are already familiar with. The computers available for the project are older Intel® Pentium® II machines. The city maintains good records for traffic volumes and roadway geometrics for the entire arterial and parallel roadways, and is interested in evaluating as many performance measures as can be provided by the tool. However, the following three performance measures are crucial: LOS, speed, and intersection delays, both at the aggregate level and for each travel mode. Traveler response needs to be considered since route shifting between the arterial and parallel facilities is of interest to the stakeholders.

Project Assessment

Based on the information provided, the following can be used to summarize the project:

Tool Category Selection Worksheet for Example 3

Table 11 shows a completed worksheet for example 3. Based on the analysis performed using the worksheet, it seems that this project can be adequately evaluated using four different tool categories, including microscopic simulation tools, followed by macroscopic and mesoscopic simulation tools and traffic optimization tools. However, the city will probably need to improve their computing capabilities in order to conduct the analysis using simulation.

3.3 Guidance for Selecting the Specific Tool

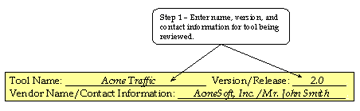
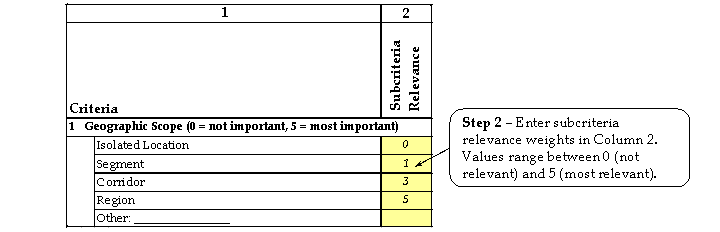
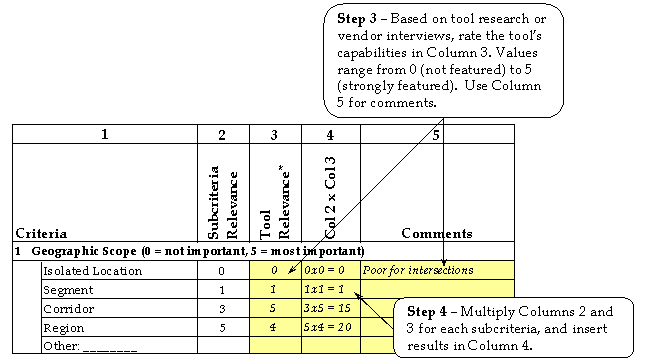
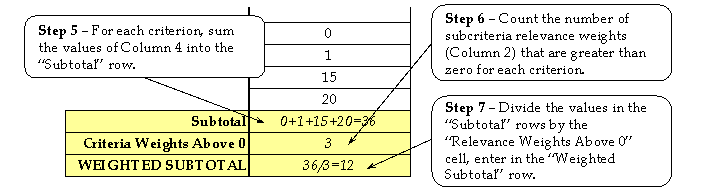
Once the most appropriate tool category has been identified, the user should narrow down the candidate tools within the category. While the features of the specific traffic analysis tools are beyond the scope of this document, the worksheet presented in Appendix C may assist users in comparing different tools during their research effort or vendor interviews. This approach is intended to help users identify what is important to consider in their selection of the specific tool(s). Instructions on how to use the worksheet are provided below:

  1. Enter the name of the tool being reviewed. If reviewing different versions/releases of the same tool, do not forget to include the version number or release date.

Figure 12.  Selecting the specific tool, step 1.  Diagram.  This figure shows an excerpt from table 14 in appendix C.  
	 Step 1 is to enter name, version, and contact information for tool being reviewed.

Figure 12. Selecting the specific tool, step 1.

  1. Assign subcriteria relevance weights (column 2). The subcriteria listed in this worksheet are expanded versions of the ones listed in Appendix B. An "other" field has been added to each criterion for users to consider other subcriteria that may not be included in this list. Subcriteria that should be highly considered in the analysis should be given higher weights. The values should range from 0 (not relevant) to 5 (most relevant). The relevance factors entered in the subcriteria relevance cells should be the relevance within that particular criteria (e.g., is the SOV travel mode more important than the HOV mode?). The subcriteria relevance weights in column 2 should be identical for every tool considered.

Figure 13.  Selecting the specific tool, step 2.  Diagram.  This figure shows an excerpt from table 14 in appendix C.  
	 Step 2 is to enter subcriteria relevance weights in Column 2.  Values range between 0 (not relevant) and 5 (most relevant).

Figure 13. Selecting the specific tool, step 2.

  1. Assign tool relevance values (column 3). The relevance factors presented in Tables 1 through 8 are generalized views of available tools for each tool category. Therefore, users must perform additional research to find the most appropriate tool within the tool category. Based on literature reviews, product specifications, or vendor interviews, the user should rate the relevance of the tools under review against the criteria presented in this worksheet. Appendix D identifies some readily available literature that contains detailed reviews of some of the more commonly used traffic analysis tools. The values entered in column 3 should range from 0 (not featured by the tool) to 5 (strongly featured by the tool). If necessary, use column 5 for additional notes and/or comments.

Figure 14.  Selecting the specific tool, steps 3 and 4.  Diagram.  This figure shows an excerpt from table 14 in appendix C.  
	 Step 3 is to rate the tool's capabilities, based on tool research or vendor interviews, in Column 3.  Values range from 0 (not featured) 
	 to 5 (strongly featured).  Use Column 5 for comments.  In step 4, multiply Columns 2 and 3 for each subcriteria, and insert results 
	 in Column 4.

Figure 14. Selecting the specific tool, steps 3 and 4.

  1. Multiply columns 2 and 3 (column 4). For each subcriterion, multiply the values in columns 2 and 3 and enter into column 4.
  2. Sum the values of column 4. Add up the values in column 4 for each criteria category, and enter the total into the "Subtotal" row for each criterion.
  3. Count the number of subcriteria relevance weights above 0. For each criterion, count the number of subcriteria relevance weights in column 2 that are larger than 0, and enter the number into the "Relevance Weights Above 0" cell.
  4. Calculate the adjusted ratings. Divide the value in the "Subtotal" row with the "Relevance Weights Above 0" value and enter into the "Weighted Subtotal" row. Repeat this process for each criterion.

Figure 15.  Selecting the specific tool, steps 5-7.  Diagram.  This figure shows an excerpt from table 14 in appendix C.  
	 In step 5, for each criterion, sum the values of Column 4 into the Subtotal row.  In step 6, count the number of subcriteria 
	 relevance weights (Column 2) that are greater than zero for each criterion.  In step 7, divide the values in the Subtotal rows by 
	 the Relevance Weights Above 0 cell, enter in the Weighted Subtotal row.

Figure 15. Selecting the specific tool, steps 5-7.

  1. Group weighted subtotals (column 8). For each criterion, copy the weighted subtotals from the respective rows to column 8 at the bottom of the worksheet.
  2. Assign criteria relevance weights (column 7). In steps 1 through 8, the weighting scheme was applied to the subcriteria within each major criteria category. This step involves weighting the major criteria categories against each other. This should be based on the project's goals and objectives, priorities, needs, and constraints. For each of the seven criteria, assign the appropriate weights, ranging from 0 (not relevant) to 5 (most relevant). The criteria relevance weights in column 7 should be identical for every tool considered.

Figure 16.  Selecting the specific tool, steps 8 and 9.  Diagram.  This figure shows an excerpt from table 14 in appendix C.  
	 Step 8 is to copy the criteria-weighted subtotals into Column 8.  Step 9 is to assign relevance weights for each criteria, ranging 
	 from 0 (not relevant) to 5 (most relevant).

Figure 16. Selecting the specific tool, steps 8 and 9.

  1. Multiply columns 7 and 8 (column 9). Multiply columns 7 and 8 for each criterion and enter the products into the appropriate cells in column 9.
  2. Determine the tool's total score. Sum column 9 and enter the product in the "Total Score" cell.
  3. Repeat this process for all tools considered. Use one worksheet for each tool under consideration. Keep in mind that the users' criteria and subcriteria relevance weights should remain constant for all tools. Users are encouraged to review as many tools as possible from each tool category selected (section 3.1). Please refer to Appendix E for a list of available tools for each category and their Web site links to obtain further information.
  4. Select the best tool. Compare the total scores of all tools under review. The one with the highest score is the probably the best tool for the project under consideration.

Figure 17.  Selecting the specific tool, steps 10-13.  Diagram.  This figure shows an excerpt from table 14 in appendix C.  
	 Step 10 is to multiply Columns 7 and 8.  Enter results in Column 9.  Step 11 is to sum the values in Column 9.  This is the 
	 reviewed tool's total score.  In steps 12 and 13, use one worksheet for each tool being reviewed.  Select the most suitable tool 
	 with the highest score.

Figure 17. Selecting the specific tool, steps 10-13.

Again, the user should review the subcriteria with high weights, but low scores, to assess whether they can be addressed through other means. If the best tool selected by this process does not satisfy the users' needs (e.g., the project's goal is ramp metering analysis; however, the best tool's ramp metering feature is only a "3"), additional tools should be researched. If necessary, review the project's goals and objectives, needs, and constraints and repeat the entire process if no tool within a particular category addresses the project's needs. In most cases, the tool selection process would be iterative. Hopefully, careful consideration of the project's goals and objectives in this process will lead the user to the most appropriate tool for the project.

Table 9. Example 1 worksheet
(refer to sections 2.1 and 2.2 for criteria definitions).

Table 9.  Example 1 worksheet (refer to Sections 2.1 and 2.2 for criteria definitions).  
	 This table shows the completed worksheet for Example 1, Ramp Metering Corridor Study.  Based on the analysis performed using the 
	 worksheet, this project can be best evaluated using three different tool categories (there are only two negative final scores, 
	 while three of seven scores are close).  The most appropriate tool category is the microscopic simulation tools, followed by 
	 macroscopic and mesoscopic simulation tools.

Table 9.  Example 1 worksheet, continued (refer to Sections 2.1 and 2.2 for criteria definitions).  
	 This table shows the completed worksheet for Example 1, Ramp Metering Corridor Study.  Based on the analysis performed using the 
	 worksheet, this project can be best evaluated using three different tool categories (there are only two negative final scores, 
	 while three of seven scores are close).  The most appropriate tool category is the microscopic simulation tools, followed by 
	 macroscopic and mesoscopic simulation tools.

Table 10. Example 2 worksheet
(refer to sections 2.1 and 2.2 for criteria definitions).

Table 10.  Example 2 worksheet (refer to Sections 2.1 and 2.2 for criteria definitions).  
	 This table shows the completed worksheet for Example 2, ITS Long-Range Plan.  Based on the analysis performed using the worksheet, 
	 the most appropriate tool category is the travel demand model.  The sketch-planning tool category should also be considered since 
	 the scores are reasonably close.

Table 10.  Example 2 worksheet, continued (refer to Sections 2.1 and 2.2 for criteria definitions).  
	 This table shows the completed worksheet for Example 2, ITS Long-Range Plan.  Based on the analysis performed using the worksheet, 
	 the most appropriate tool category is the travel demand model.  The sketch-planning tool category should also be considered since 
	 the scores are reasonably close.

Table 11. Example 3 worksheet
(refer to sections 2.1 and 2.2 for criteria definitions).

Table 11.  Example 3 worksheet (refer to Sections 2.1 and 2.2 for criteria definitions).  
	 This table shows the completed worksheet for Example 3, Arterial Signal Coordination and Preemption.  Based on the analysis 
	 performed using the worksheet, it seems that this project can be adequately evaluated using four different tool categories, 
	 including microscopic simulation tools, followed by macroscopic and mesoscopic simulation tools and traffic optimization tools.

Table 11.  Example 3 worksheet, continued (refer to Sections 2.1 and 2.2 for criteria definitions).  
	 This table shows the completed worksheet for Example 3, Arterial Signal Coordination and Preemption.  Based on the analysis 
	 performed using the worksheet, it seems that this project can be adequately evaluated using four different tool categories, 
	 including microscopic simulation tools, followed by macroscopic and mesoscopic simulation tools and traffic optimization tools.

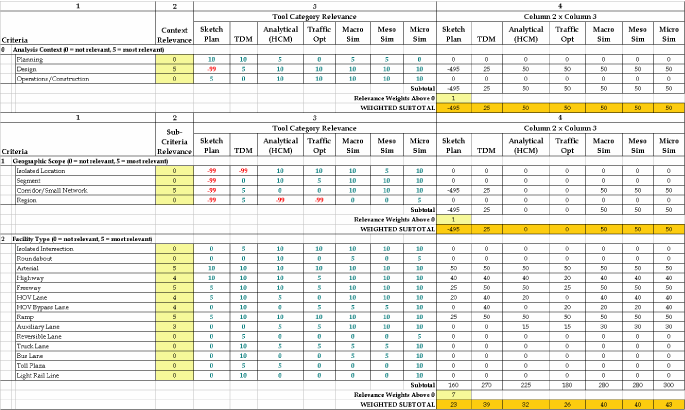
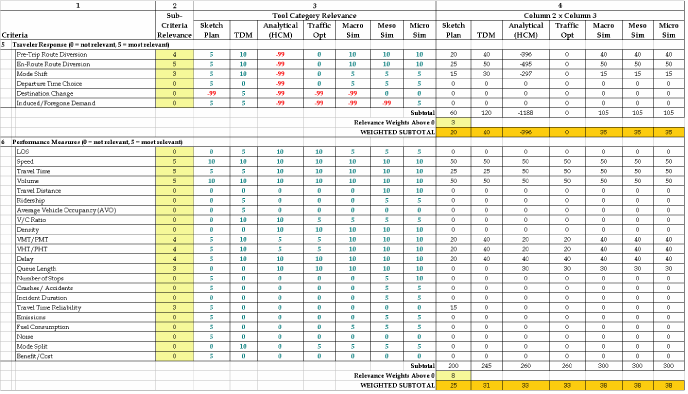
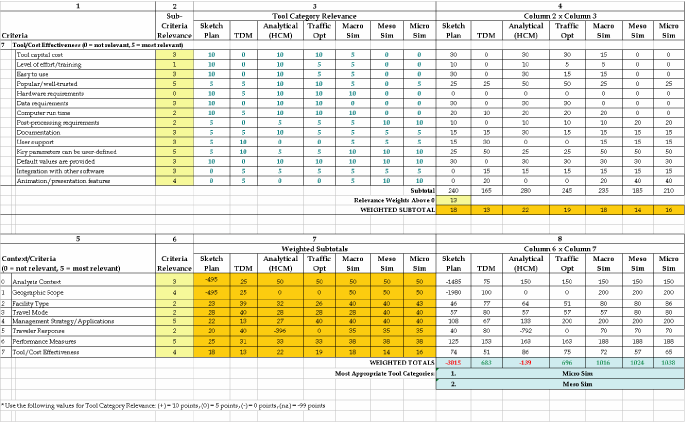
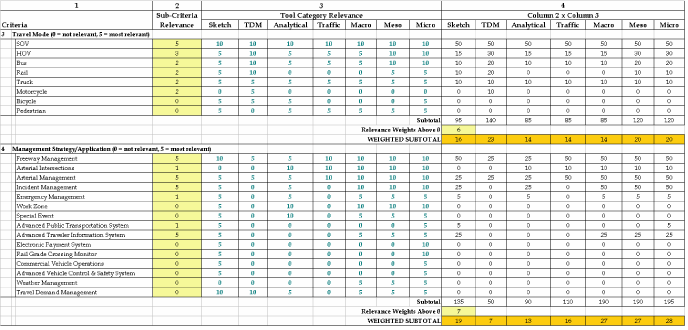
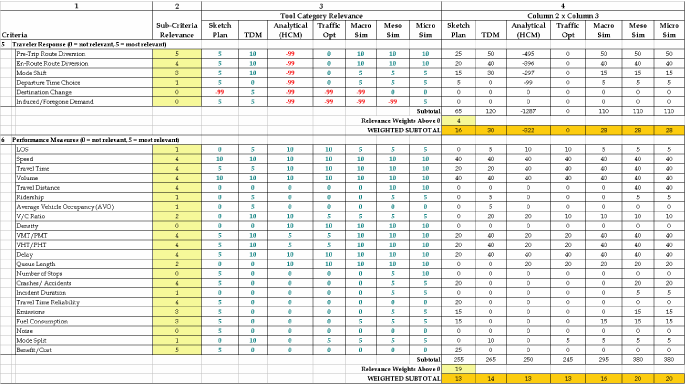
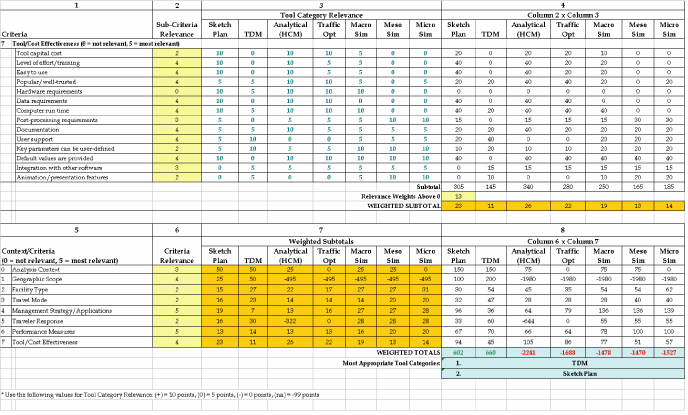
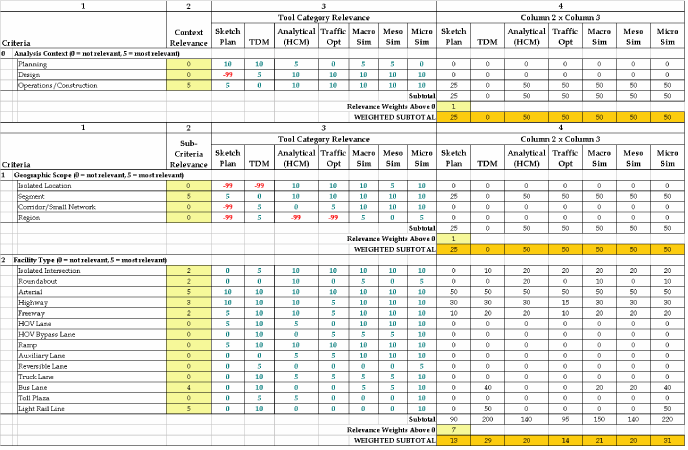
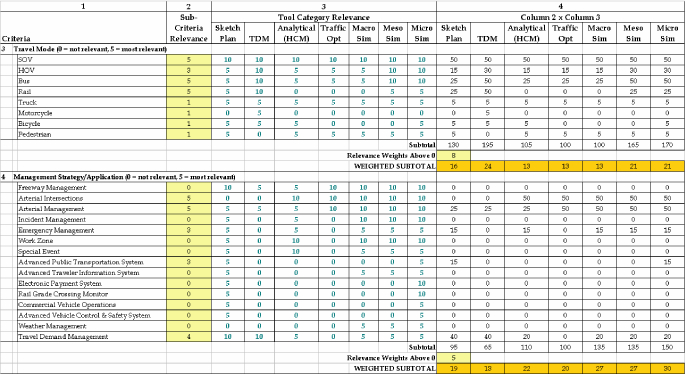
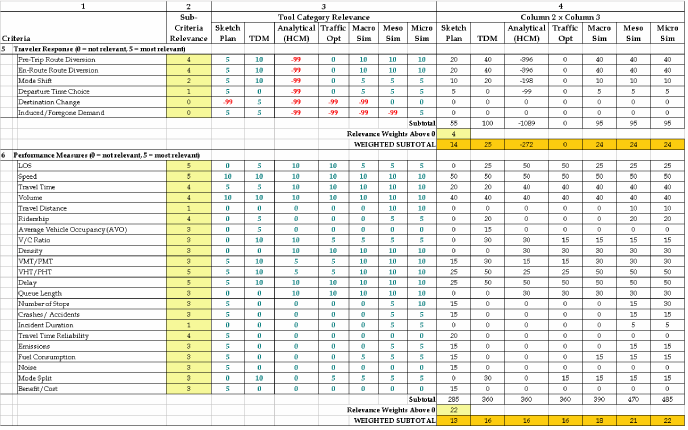
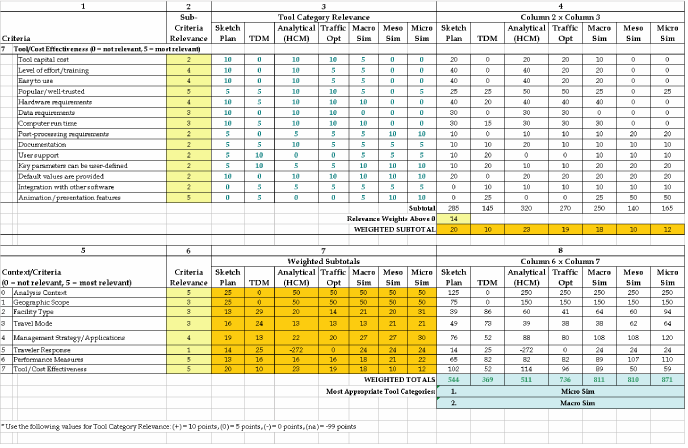
Table of Contents | List of Tables | List of Figures | Top of Section | Previous Section | Next Section | HOME


FHWA Home
FHWA
Federal Highway Administration - United States Department of Transportation