4. Using FTAT
Figure 1 shows the components in the Freight Technology Assessment Tool.

Figure 1. The Freight Technology Assessment Tool
The tool may be used from two perspectives, either the "Business Process Mapping/Technology Evaluator" perspective or the "Expert Panel" perspective. Each perspective is summarized as follows:
The Business Process Mapping/Technology Evaluator Perspective:
- Defines/maps the different parties involved in the process.
- Defines the relationship between the different parties.
- Defines the business processes of each party.
- Defines cost drivers.
- Assigns cost drivers to business processes.
- Generates a list of the cost drivers associated with the business process.
- Inputs the as-is process cost.
- Inputs the as-is cost driver value.
- Defines qualitative measures.
- Assigns qualitative measures to business processes
The Expert Panel Perspective:
- Selects a technology to be evaluated or defines a new technology.
- Selects business processes that will be affected by the technology.
- Rates the technology against the list of qualitative measures generated.
- Runs the qualitative analysis using the Quality Function Deployment (QFD).
- Inputs the technology cost information.
- Inputs the to-be cost driver value.
- Inputs technology benefits information.
- Generates the output report.
Also, the Technology Evaluator or Expert Panel will have the right to:
- Add new processes, assign performance measures to new processes, and assign cost drivers to new processes.
- Add new performance metrics and assign new measures to processes.
- Add a new cost driver and assign a new cost driver to processes.
The integrated methodology presented in Figure 1 is described below.
4.1 Business Process Analysis
4.1.1 Business Process Mapping
The Business Process Mapping portion enables a user to define and map the end-to-end business process. A user identifies business processes by documenting business units on a geographical map and assigning processes to business units by selecting from a predetermined list of processes or by defining new processes. The business processes can be mapped when users:
- Select Geographical Map from the left panel.
- Drag and drop a shape that identifies the node in the supply chain from the Supply Chain Stencil.
- Select the shape.
- Select Edit > Edit Node from the menu after which the Edit Business Processes window will open (Figure 2).

Figure 2. Edit Business Processes
- Click the Add Process button at the bottom of the window, and the Processes window will appear (Figure 3).

Figure 3. Processes – Process Category
- Add a Process Category (Figure 3): (The fields will be blank if no processes are added.)
- Type Category ID.
- Type the Category Name.
- Type the Category Definition.
- Click Update.
- Add a Process
- Go to Process tab (shown in Figure 4).
- Type Process ID.
- Type Process Name.
- Select the process Category ID from the drop-down menu.
- Type the Process Definition.
- Click Update and close window.

Figure 4. Processes – Process
- Click Edit on the toolbar and select Edit Node, after which a window will pop up. The added process will now appear in the screen shown in Figure 2.
- Click boxes that apply to the supply chain partner.
- Click OK.
- Repeat steps 2 through 8 to add processes.
- Select two shapes to connect the nodes in the supply chain in their flow order by selecting the first shape then holding the Ctrl key and then selecting the second shape; to establish the connection, click Deliver or Return on the toolbar.
- After dragging and dropping all required shapes, select the one that is the focus of the study. Then click Processes on the toolbar or Edit > Edit Node from the menu and check the box next to the name of the process to indicate the node that is the focus of the study. If you don't, the program will select a default focus.
4.1.2 As-Is Processes Cost
The Business Process Mapping/Technology Evaluator user can input the cost of each process. The as-is process cost can be defined when users:
- Click As-is Process Cost on the toolbar or select menu Edit > Process Costs.
- A Process List is generated based on the business process mapped; the window that will pop up is shown in Figure 5.
- Input the Annual Cost of each process.
- Click OK.

Figure 5. Process Costs
4.1.3 Cost Drivers
The Business Process Mapping/Technology Evaluator user can generate a list of predetermined cost drivers or add a new cost driver. A new cost driver can be added when users:
- Click the toolbar and select Edit > Cost Drivers; a window will pop up (as shown in Figure 6).

Figure 6. Cost Drivers
- Add a Process Cost Driver:
- Select Process ID from the drop-down menu.
- Type Cost Driver Name.
- Type the Process Definition.
- Click Add.
- Close window.
- Repeat steps 1 and 2 to add other cost drivers.
4.1.4 As-Is Cost Driver Values
Business Process Mapping/Technology Evaluator users can enter the as-is value of a generated list of predefined cost drivers or newly added cost drivers. A cost driver is defined as the value that drives the cost of the process up or down. A cost driver value can be added when users:
- Click As-is Process Cost on the toolbar or select menu Edit > Process Cost, then select the Cost Drivers tab (as shown in Figure 7).

Figure 7. Cost Drivers
- A Cost Drivers list is generated.
- Input the "As Is" Value of each process.
- Input unit information on the cost driver (e.g., year) by typing in the unit value or by selecting from the drop-down menu.
- Click OK.
4.1.5 Performance Measures
Business Process Mapping/Technology Evaluator users can generate a list of predefined performance measures or add a new performance measure when they:
- Select Performance Measures from the left panel.
- Click the Add button below the right panel to cause a window to pop up (as shown in Figure 8).

Figure 8. Performance Measures
- Input the information related to the new performance measure:
- Type Performance Measure Name.
- Type Performance Measure Class.
- Select Performance Measure Attribute from the drop-down menu.
- Type Performance Measure Definition.
- Click Processes tab.
- When users select the Processes tab shown in the window above, a new window will open (as shown in Figure 9).

Figure 9. Performance Measures Processes
- Assign Processes that apply to the new performance measure:
- Select a Process from the left.
- Click (>>) button or double-click the Process.
- Click OK.
- Repeat steps 1 through 6 to add other performance measures.
4.2 Technology Evaluation
The quantitative analysis is the second phase of the technology evaluation methodology used by the Freight Technology Assessment Tool. The tool enables the user to assess a technology (or a group of technologies) quantitatively by computing a set of financial measures for each technology. The financial measures include the net present value (NPV) of the technology(ies), internal rate of return (IRR), payback period, discounted payback period, and the benefit-cost ratio. To compute these financial measures, the user has to input some financial data for each technology. The inputs include technology costs (initial investment and annual costs), the useful life of the technology, and the required rate of return. The expert panel will add the to-be cost driver value to the technology benefits input (annual anticipated gains and cost reduction) related to processes (as-is process cost and as-is cost driver value during the business process mapping phase). The as-is process cost, the as-is cost driver, and the to-be cost driver will be used to compute the to-be process cost from which the process improvement cost will be computed. The process improvement cost is a direct input to the technology benefits.
4.2.1 Technology Selection/Rating
Expert Panel or Technology Evaluator users can define a new freight technology when they:
- Select Technologies from the left panel.
- Click the Add button from the toolbar below the right panel, after which a window will pop up (as shown in Figure 10).

Figure 10. Technology
- Type Technology Name.
- Type Technology Class.
- Type Technology Definition.
- Click Update.
4.2.2 Select Processes
Users must select processes that a particular technology will impact. To select processes, the user must:
- Click Next or select the Processes tab, after which a window will be displayed (as shown in Figure 11).

Figure 11. Technology – Process
- Select Processes to identify what the technology will impact.
- Double click the process or click the (>>) button to move it to the right.
4.2.3 Performance Measures Ratings
The Expert Panel or Technology Evaluator user rates the technology with respect to performance measures. The ratings range from -5 to +5 (in increments of 1), where a negative rating indicates the technology downgrades the performance measure, a zero rating indicates the technology does not affect the performance measure, and a positive rating indicates the technology enhances the performance measure.
- Click the Rating tab or Next button, after which a window will pop up (as shown in Figure 12):

Figure 12. Intermodal Database – Rating
- A list of performance measures will be displayed.
- The Expert Panel user will select a measure and use the drop-down menu under Rating to rate the performance measure.
The completion of performance measure rankings is the first step toward evaluating a particular technology. The user will repeat the same step for other technologies, then move on to the next step, Quality Function Deployment (QFD), which qualitatively assesses a technology or group of technologies.
4.2.4 Technology Cost Information
The user will select a technology or define a new technology, then enter financial information for each technology as follows:
- Click Next or select the Costs tab. A window will pop up with the Cost fields that need to be populated (as shown in Figure 13).

Figure 13. Technology – Costs
- Under Costs, type in Initial Investment, Operating Cost, Maintenance Cost, Other Costs, and Useful Life.
4.2.5 To-Be Cost Driver Values
The Expert Panel or Technology Evaluator user enters cost driver values based on the as-is process costs and as-is cost drivers defined and entered in the tool by the business process mapping user. To-be cost drivers can be populated when users:
- Click Next or select the Drivers tab. A window will pop up (as shown in Figure 14).
- Add the To-Be Cost Driver Value for each process

Figure 14. Intermodal Database – Drivers
4.2.6 Technology Benefits Information
The Expert Panel or Technology Evaluator user will enter the monetary benefits of each technology. Benefits can be populated when users:
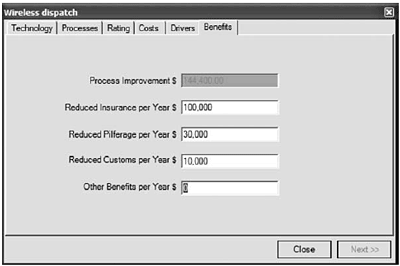
- Click Next or select the Benefits tab. A window will pop up with the Benefits field to be populated (as shown in Figure 15).

Figure 15. Wireless Dispatch
- Add all Benefits: Reduced Insurance, Reduced Pilferage, Reduced Customs, and Other Benefits.
That was the last step to be carried out in the integrated methodology. Up to this point the technologies were evaluated qualitatively and quantitatively. The final output of the methodologies is summarized in a table format with columns representing different technologies and rows representing qualitative criteria (i.e., performance attribute scores and total score) and quantitative criteria (i.e., financial measures such as IRR, NPV, and benefit-cost ratio).
- Click Close
- Repeat steps in section 4.2.1 through 4.2.6 to evaluate additional technologies.
4.2.7 Quality Function Deployment (QFD)
The QFD portion enables the user to asses a technology qualitatively (or group of technologies) by generating a total score for each technology. The QFD analysis can be executed after defining the business process and rating the technology against the performance measures. The total score is computed automatically for each technology, given that an Expert Panel has rated the technology against the list of performance measures. The QFD (shown in Figure 16) can be executed when users:
- Select QFD from the left panel.
- Select menu View > Update.

Figure 16. QFD Matrix
The QFD matrix, which consists of performance metrics (rows) grouped by performance attribute and technologies (columns), will be generated; it is populated with the ratings of each metric for each technology. The total score of each technology will be computed below the QFD matrix.
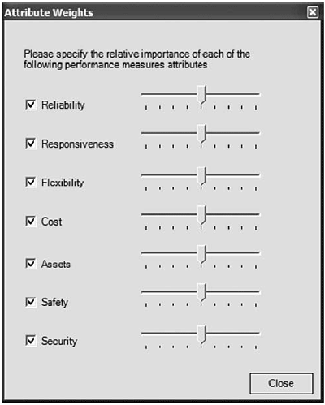
The primary QFD execution gives equal weight to performance attributes. However, relative weights of the seven attributes can be altered to change the focus of the QFD analysis. For example, if the user would like to select a technology that increases the relative weight of security measures, the user would:
- Click Attribute Weights from the toolbar in the QFD screen.
- A window will pop up with seven attributes, all selected by default and weighted equally (as shown in Figure 17).

Figure 17. Attribute Weights
- Select required performance attributes; deselect attributes that do not apply whatsoever.
- Increase the weight of an attribute relative to all the other selected attributes' weights by moving the scale.
4.2.8 Final Output
The final output includes a summary report of the qualitative and the quantitative analysis of each technology, including its performance score, net-present value, internal rate of return, payback period (years), discounted payback period (years), and benefit-cost ratio.
The output summary can be generated by:
- Selecting the output summary from the left panel.
- Selecting menu View > Update.
4.2.9 Output Reports
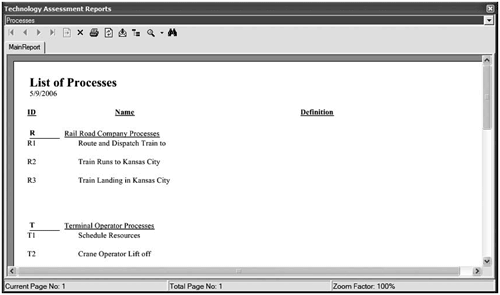
Several output reports may be generated for a project and may be accessed by selecting View > Report, after which a window will pop up like the one shown in Figure 18.

Figure 18. Reports
Reports can be generated for:
- Processes.
- Performance Measures.
- Process Costs.
- Technologies.
- As-Is Cost Drivers.
- Technology Ratings.
- Technology Assessments.
The user can print displayed reports by clicking the printer icon on the toolbar.
4.2.10 Export to Excel
The user can export the QFD worksheet and the output summary to Excel by selecting File > Export to Excel.
previous | next