Pilot/Escort Certification Course
View the PDF Version [3.9 MB]
You will need the Adobe
Reader to view this PDF.
slide 1
Pilot/Escort Certification Course
slide 2
Welcome!
slide 3
Course Content
- Student Introductions
- Instructor Introduction
- Course Schedule
slide 4
Initial Paperwork
slide 5
Required Paperwork
- Registration
- Insurance Verification
- Driving Record
- Course Evaluation
slide 6
Required Paperwork
- Documents required by certifying State.
slide 7
Course Topics and Timetable
slide 8
Course Topics and Timetable
| 8:00 - 8:30 | Registration |
| 8:30 - 8:45 | Introductions, Course Outline |
| 8:45 - 9:00 | Student Material Contents, Sources of Information |
slide 9
Course Topics and Timetable
| 9:00 - 10:00 | Modules 1 and 2 Introduction/Industry Background Pilot/Escort Vehicle Operator (P/EVO) and Vehicle Requirements |
| 10:00 - 10:15 | Break |
slide 10
Course Topics and Timetable
| 10:15 - 11:45 | Modules 3 and 4 Route Planning/Route Surveys Pre-trip Activities |
| 11:45 - 1:00 | Lunch Break Paperwork Issues |
slide 11
Course Topics and Timetable
| 1:00 - 2:15 | Module 5 Trip Operations |
| 2:15 - 2:30 | Break |
| 2:30 - 3:30 | Modules 6 & 7 Post-trip Activities and Driver Safety |
slide 12
Course Topics and Timetable
| 3:30 - 3:45 | Break |
| 3:45 - 4:30 | Module 8 Course Review and Exam |
slide 13
Questions?
slide 14
Course Overview
slide 15
Course Content
This manual includes 7 modules:
| Module 1 | Course Introduction & Industry Background. |
| Module 2 | Pilot Escort Operator & Vehicle Requirements. |
slide 16
Course Content
| Module 3 | Route Planning |
| Module 4 | Pre-trip Activities |
| Module 5 | Trip Operations |
slide 17
Course Content
| Module 6 | Post-Trip Activities |
| Module 7 | Driver Safety Issues |
| Module 8 | Course Review, Exam, Final Paperwork |
slide 18
Module One - Lesson One
- P/EVO Industry Safety Efforts
- Lack of Uniformity
- Purposes and Roles of P/EVOs
slide 19
Course Content
Gaining skill as a P/EVO is similar to most jobs: A person learns a job by doing that job. People typically improve their skills over time.
slide 20
Course Content
It is necessary to learn the laws of the road before doing the job.
In this way, P/EVO certification is similar to the process of getting a driver's license.
slide 21
Course Content
- What you Need to know.
- What is Nice to know.
- Where to go.
slide 22
Sources of Information
Where to Go
slide 23
Sources
Best Practices for Pilot/Escort Operators
Federal Highway Administration (FHWA)
slide 24
Sources
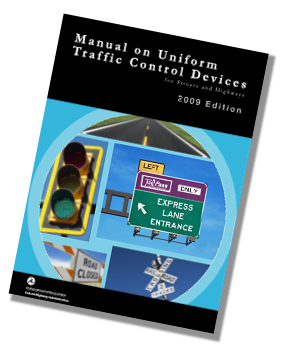
Flagging Standards MUTCD (Manual on Uniform Traffic Control Devices)
slide 25
Sources
Driver Safety Information AAA (American Automobile Association)
slide 26
Sources
State Agencies
Websites and Documents
Laws and Rules
slide 27
General Information
Pilot/Escort rules vary from State to State.
Escort drivers must be aware of the rules in any State in which they operate, as it is with all drivers.
slide 28
General Information
Pilot/escort operations are administered by various agencies and this, too, varies from State-to-State.
slide 29
General Information
FHWA maintains a list of all State permit offices (and Canadian provinces) that includes websites and telephone numbers.
Link: https://www.ops.fhwa.dot.gov/freight/sw/permit_report/index.htm
slide 30
Certification Examination
States vary in the type and number of test questions and in the score required to pass the test. There are also differences in the number and type of questions.
slide 31
Module One - Lesson Two
- P/EVO Industry Background
- Regulation of Industry
- Purpose of P/EVO Certification
slide 32
Purposes of P/EVO Certification
Escorting oversize loads requires skill and awareness similar to that of emergency vehicle operators, tow truck drivers, roadside mechanics, and others who perform dangerous roadside operations.
slide 33
Purposes of P/EVO Certification
"Large trucks are involved in about 1 in 10 highway deaths."
Insurance Institute for Highway Safety, Large Trucks Fatality Facts 2013
slide 34
Role of P/EVOs
P/EVOs are in place to assist in reducing injuries and fatalities, and in preventing damage to vehicles and transportation infrastructure.
slide 35
Goals of P/EVO Training
Certification training for P/EVOs is designed to prepare individuals for the safe movement of oversize loads, and to standardize the training of P/EVOs.
slide 36
Standardization/Harmonization
Efforts at harmonization:
American Association of State Highway and Transportation Associations and regional organizations: Western, Northeast Association of State Highway and Transportation Officials, Southeast and Mid-American Associations of State Highway and Transportation Officials.
- Specialized Carriers & Rigging Association (SC&RA)
slide 37
Standardization/Harmonization
Efforts at harmonization:
- Owner Operator Independent Drivers Association. (OOIDA)
- National Pilot Car Association. (NPCA)
slide 38
Standardization/Harmonization
See AASHTO, Board of Directors: Actions to Reduce Impediments to Inter-State Commerce, Harmonizing Requirements for Truck Permits
PR-3-12 & PR-3-13 available: http://www.aashtojournal.org/Documents/November2012/PR-3-12.pdf
slide 39
Review Questions
slide 40
Review Questions
Is P/EVO certification valid in all 50 States?
What are the main reasons for requiring P/EVOs be certified?
slide 41
Review Questions
Why do laws pertaining to escort drivers differ from State to State?
Who issues P/EVO certification cards (within the State)?
slide 42
Review Questions
Where are standards for proper flagging procedures found?
Where are best practices for the pilot/escort industry found?
slide 43
Review Questions
Are P/EVOs responsible to know the laws in every State in which they work?
Why are P/EVOs required when moving oversize loads?
slide 44
Module Two - Lesson One
- Purposes of P/EVOs
- P/EVO Requirements
- Reciprocity Among States
slide 45
P/EVO Requirements
States that currently have certification or training requirements for P/EVOs are:
Arizona, Colorado, Florida, Georgia, Minnesota, New York, North Carolina, Oklahoma, Utah, Virginia, and Washington.
slide 46
Purposes of Certification
To Enhance Safety
When the job is done right, pilot/escorts provide benefits to the public, the load driver, trucking company, and the escort him/herself.
slide 47
Purposes of Certification
To Reduce Congestion
Prevent or minimize delays to the normal flow of traffic.
To Harmonize State Certification
Standardize the Pilot/Escort Vehicle Operator Industry.
slide 48
Purposes of Certification
To Protect Lives and Property
Incidents happen when we violate or ignore laws and safe driving practices. These are not accidents, as mentioned.
slide 49
Purposes of Certification
To Prevent Damage to Transportation Infrastructure
To Prevent Insurance Rate Increases and Legal Issues
slide 50
P/EVO Requirements
Many of these States have reciprocal agreements in place, similar to driver's licenses and CDLs.
However . . .
slide 51
P/EVO Requirements
Not all States accept certification from all other States, and, depending on the State, P/EVO certification lasts anywhere from 3 to 5 years.
States also vary in the type and amount of insurance coverage required for P/EVOs.
slide 52
P/EVO Requirements
Many other differences exist among the States.
For example, many States require P/EVOs be 21 years old, while some allow P/EVOs to be certified at 18.
slide 53
P/EVO Requirements
Some States require drive safety or flagger training courses in addition to the basic P/EVO certification.
Not all States authorize P/EVOs to control traffic.
slide 54
P/EVO Requirements
These are just a few examples of the differences that exist, and it is the responsibility of the P/EVO to know the laws and rules in any jurisdiction in which they operate.
slide 55
P/EVO Skills
P/EVOs must have excellent communication skills, and be engaged in all aspects of oversize load movement.
slide 56
P/EVO Requirements
P/EVOs should never display any badge, shield, emblem, or uniform resembling those used by law enforcement officers.
slide 57
Review Questions
slide 58
Review Questions
What are the purposes of certification for pilot/escort drivers?
Of these purposes, which is the most important?
slide 59
Review Questions
Certification typically lasts how long?
Do all States require the same insurance for P/EVOs?
slide 60
Review Questions
How old must P/EVOs be?
When is it appropriate for a P/EVO to wear uniforms similar to those used by law enforcement officers?
slide 61
Module Two - Lesson Two
- Escort Vehicle Requirements
slide 62
Escort Vehicles
Some States do not allow cargo vans or panel trucks to be used as escort vehicles because the driver cannot see in all directions (360 degrees) when driving these vehicles.
slide 63
Escort Vehicles
Some States require that cars used as escort vehicles weigh at least 2,000 pounds, or have a minimum 1/4 ton load capacity for pick up trucks.
slide 64
Escort Vehicles - Signs - State Rules
Most States require the escort vehicle provide information about the P/EVO on both sides of the vehicle.
State rules vary, but most require:
slide 65
Escort Vehicles - Signs - State Rules
The name of the individual and/or the company name, city, and State.
Other States require the telephone number be included. Logos and slogans are allowed.
slide 66
Escort Vehicles - Signs - State Rules
John & Jane P. Voe
Escorts Extraordinaire
You Name It, ST
000.000.0000
Smile after mile...
slide 67
Escort Vehicles - Signs - State Rules
Typically these signs do not have to be removed when not performing escort duties, but P/EVOs must know the rules.
slide 68
Escort Vehicle - Signs - State Rules
States also vary substantially in terms of the equipment that P/EVOs must carry or display on their vehicles. There is one sign that all States require:
The Oversize Load sign
slide 69
Escort Vehicle - Signs - State Rules
Although all States require the Oversize Load sign, the location of the sign (where on the vehicle it is to be installed), and the size of the sign vary from State-to-State.
slide 70
Escort Vehicle - Signs - State Rules
P/EVOs must consider this, when considering where to put the Oversize Load sign: many States allow the sign to be installed on the top of the vehicle. This is recommended for two reasons:
slide 71
Escort Vehicle Signs - State Rules
First, the sign is more visible and can be easily seen in both directions when on top of the escort vehicle.
Second, looking to the future, emerging crash avoidance technology uses sensors mounted inside vehicle bumpers.
slide 72
Escort Vehicle Equipment
In addition to the signs mentioned, red flags are also required by many States. Some States require 2, others require 4.
Some States require 12" X 12" flags while others require 18" X 18" flags.
slide 73
Escort Vehicle Equipment
Other equipment typically required includes:
Warning light (Amber in color; visible from 500 feet; must rotate, oscillate, or flash through 360 degrees).
slide 74
Escort Vehicle Equipment
Full-size spare tire(s)/required tools to change tires.
Outside mirrors (on each side of load vehicle).
slide 75
Escort Vehicle Equipment
Hardhats and retro-reflective high visibility garments.
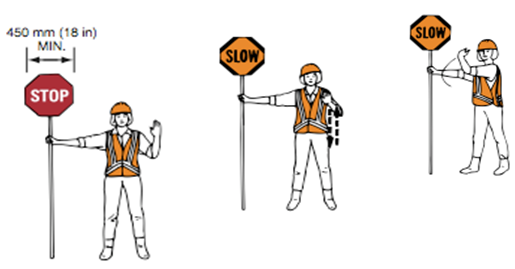
STOP/SLOW paddles (18" and/or 24").
Red flag (24" x 24") for controlling traffic (only if paddle not available).
slide 76
Escort Vehicle Equipment
Cones and/or triangle reflectors.
Flashlight and traffic wand/cone.
First aid kit (P/EVOs should be certified in CPR and basic first aid).
slide 77
Escort Vehicle Equipment
Spare parts/fluids/basic tools.
Fire extinguisher(s).
Height pole.
slide 78
Escort Vehicle Equipment
CB radio—CBs remain the best equipment for the load movement team.
Other State specific equipment.
slide 79
Review Questions
slide 80
Review Questions
What equipment is typically required for P/EVOs?
How do P/EVOs determine the equipment & signage a State requires?
slide 81
Review Questions
What sign is required in all States? Color? Size? Installed where?
What is the recommended device for communicating with the load team? Why?
slide 82
Review Questions
Are cargo vans or panel trucks appropriate for use as escort vehicles? Why or why not?
slide 83
Review Questions
What are the advantages of putting the Oversize Load sign on top of the escort vehicle rather than on/near the bumpers?
slide 84
Review Questions
What is the minimum size for the STOP/SLOW paddle?
What can be used to flag traffic in an emergency (if no paddle is available)?
slide 85
Review Questions
Why are CB radios recommended for P/EVOs?
slide 86
Module Three - Lesson One
- Route Planning
- Route Selection
slide 87
Route Planning
Routes for moving oversize loads are often specified in the permit.
Routes are determined and selected with the safety of highway users as the top priority.
slide 88
Route Planning
If a route survey is required, it is often P/EVOs who conduct the route survey.
slide 89
Module Three - Lesson Two
- Route survey procedures
- Contents
- Evaluation of route survey
slide 90
Route Surveys
Routes for moving oversize loads are often specified in the permit. Equipment needed includes hardhat, high visibility garment, and any equipment that makes roadside operations safer.
slide 91
Route Surveys
Current maps that show all highways and roads, measuring devices, and a height pole are needed.
A dashboard camera, digital voice recorder, and still camera are strongly recommended.
slide 92
Route Surveys
When doing a route survey, warning lights should be used. Consult State and local laws for specific requirements.
slide 93
Route Surveys
Before doing the route survey, it is vital to have as much information as possible about the load, including length, height, and width, as well as the vehicle configuration (articulated trailers, for example).
slide 94
Route Surveys
Route surveys should include:
- Basic information about the load.
- Point of origin and destination.
- Transportation infrastructure details.
- Stopping/parking locations.
slide 95
Route Surveys
Route surveys should include:
- Bridges, overpasses, overhead wires.
- Railroad crossings/elevation changes.
- Emergency contact information.
- Ports-of-entry and inspection stations.
slide 96
Route Surveys
Route surveys should include:
- Runaway truck ramps.
- Pot holes.
- Narrow shoulders.
- Mailboxes.
slide 97
Review Questions
slide 98
Review Questions
What determines the route to be followed, and dates and times of travel?
What are the benefits of the lead P/EVO also conducting the route survey?
slide 99
Review Questions
What criteria are important when planning a route for an oversize load?
slide 100
Review Questions
What equipment/materials are needed to conduct a route survey?
What safety equipment should be used when conducting a route survey?
slide 101
Review Questions
What should be included in a route survey?
Under what two conditions do railroad crossings become most hazardous?
slide 102
Module Four - Lesson One
- Pre-trip Planning Procedures
- Assignment Confirmation
slide 103
Pre-Trip Activities
The goals of pre-trip planning activities include minimizing risks, informing all load movement team members of hazards, and avoiding delays.
slide 104
Pre-Trip Activities
Cultivating an open climate is critical. Every member of the load movement team must be able to raise questions and concerns at any time.
slide 105
Contingency Planning
Contingency planning involves preparing for the unexpected. This kind of planning focuses on the question:
"What if...?"
slide 106
Contingency Planning
What if the load vehicle breaks down? Or an escort vehicle?
What if the load strikes a bridge? Or becomes lodged at a railroad crossing?
slide 107
Contingency Planning
What if a vehicle catches fire?
What if the load shifts?
What if the weather deteriorates?
What if a driver gets sick?
slide 108
Contingency Planning
Contingency plans have at least four benefits:
- Identifying risks and potential risks.
- Identifying measure needed to protect lives and property.
slide 109
Contingency Planning
- Identifying individual roles and responsibilities.
- Establishing and developing networks among team members and support staff.
slide 110
Pre-Trip Activities
It is also critical that the load movement team address potential emergency situations during pre-trip planning.
All pre-trip meetings should be documented and included in the trip log.
slide 111
Review Questions
slide 112
Review Questions
Why is an open climate of cooperation among members of the load team critical to safety?
What question does contingency planning address?
slide 113
Review Questions
What are some of the benefits of contingency planning?
slide 114
Module Four - Lesson Two
- Pre-trip Safety Meeting
slide 115
Pre-Trip Safety Meeting
Many States require a pre-trip safety meeting that involves the load driver as well as P/EVOs.
slide 116
Pre-Trip Safety Meeting
Others who may need to be involved include law enforcement escorts, permit officials, public utility personnel, and others.
slide 117
Pre-Trip Safety Meeting
During the pre-trip safety meeting, it is important for team members to identify themselves and their role(s).
slide 118
Pre-Trip Safety Meeting
Load issues should be discussed in detail, especially loads with very low ground clearance and tall loads (13' 6" or taller). Load issues should be discussed in detail, especially loads with very low ground clearance and tall loads (13' 6" or taller).
slide 119
Pre-Trip Safety Meeting
The route survey should be reviewed by all team members, and the route should be discussed in detail.
slide 120
Pre-Trip Safety Meeting
Hazardous material transportation requires even more meticulous planning and a full understanding of emergency procedures by all load movement team members.
slide 121
Modified Pre-Trip Meeting
It is sometimes the case that pre-trip meetings are not possible.
In this situation, a modified pre-trip meeting should (or as required by the States) be conducted.
slide 122
Modified Pre-Trip Meeting
This situation is described as a "pick up on the move" or a "non-stationary transfer of responsibility."
slide 123
Modified Pre-Trip Meeting
After the non-stationary transfer, the load movement team should stop at the first safe opportunity to conduct the pre-trip safety meeting.
slide 124
Modified Pre-Trip Meeting
It is important to reduce pressure to "get back on the road" and to encourage team members to speak up any time they have questions and concerns.
slide 125
Review Questions
slide 126
Review Questions
What information should be obtained when confirming a P/EVO assignment?
What topics should be covered in a pre-trip safety meeting?
slide 127
Review Questions
What determines the number of escorts required for a specific load? What determines the route? Curfews?
What is a "pick up on the move?" What are the two types?
slide 128
Review Questions
If communication cannot be established between the P/EVO(s) and the load driver, what should the team members do?
slide 129
Review Questions
Explain the Statement: "For P/EVOs, every job is a proto-type."
slide 130
Module Four; Lesson Three
- Vehicle inspections
slide 131
Vehicle Inspections
Explain the Statement: "Inspection is a process, not an event."
slide 132
Vehicle Inspections
Vehicles should be inspected not only before a trip begins, but also at every opportunity, such as fuel or food breaks.
slide 133
Vehicle Inspections
Nearly 55% of trucks that crashed had at least one mechanical violation.
Almost 30% had at least one condition serious enough to have taken the vehicle immediately out of service.
slide 134
Vehicle Inspections
The two most common violations involved brakes (36%) and lights (19%).
slide 135
Vehicle Inspections
Vehicle inspections are done for safety, but other benefits include:
- Discovering a malfunction before expensive repairs are necessary.
slide 136
Vehicle Inspections
- Avoiding delays in load movement related to a breakdown or failing inspection.
- Avoiding fines.
slide 137
Vehicle Inspections
Continual monitoring of vehicles, not only on the outside, but also inside the vehicle, including gauges and communication equipment, is vital while on the road.
slide 138
Vehicle Inspections
While on the road, drivers must monitor all gauges and continually "look, listen, smell, and feel."
slide 139
Vehicle Inspections
A paperwork inspection—checking licenses, certifications, insurance verifications, etc., to ensure all documents are current and adequate for the States on the route.
slide 140
Review Questions
slide 141
Review Questions
What is the primary purpose of vehicle inspections? What are other benefits?
slide 142
Review Questions
In addition to vehicles, what else should be inspected and/or monitored?
Explain the seven-step inspection method. Why is it useful?
slide 143
Module Five - Lesson One
- Characteristics of oversize loads
- Stopping distances
- Load movement
- Roles of front & rear P/EVOs
slide 144
Trip Operations
P/EVOs must follow the laws and rules required of all drivers.
P/EVOs are never allowed to run traffic signals or signs, cross the center line, or fail to yield.
slide 145
Trip Operations
P/EVOs must never stop a vehicle in a roadway to block traffic.
slide 146
Characteristics of Oversize Loads
In order for P/EVOs to understand how to improve safety, they must know the characteristics of typical oversize loads.
slide 147
Characteristics of Oversize Loads
For example, oversize loads take longer to stop, change lanes, or pass other vehicles.
slide 148
Characteristics of Oversize Loads
Oversize loads have more blinds spots and the blind spots are bigger than those of other vehicles.
Oversize loads take longer to get up to speed when entering highways.
slide 149
Characteristics of Oversize Loads
Oversize loads, especially long ones, often consume several lanes when making turns. Anytime an oversize load must be moved in reverse, spotters should (or as required by the States) be used.
slide 150
Trip Operations
When establishing how far the P/EVOs should be from the load vehicle, stopping distances are the most important criteria to consider.
slide 151
Stopping Distance
Typical tractor-trailers often weigh 20 to 30 times as much as passenger vehicles.
Weight is a central determinant of stopping distance.
slide 152
Stopping Distance
How fast a vehicle is moving also affects stopping distance.
Stopping distance increases by the square of the amount the speed increases.
slide 153
Stopping Distance
So if speed doubles from 20 to 40 mph, stopping distance increases by 4 times.
slide 154
The Roles of P/EVOs
P/EVOs are in place primarily to enhance safety by warning motorists of the oversize load.
P/EVOs also enhance safety by warning the load driver of hazards.
slide 155
Lead P/EVOs
Lead P/EVOs have responsibilities related to navigation, communication, height pole operation, and providing adequate warning to motorists and to the load movement team.
slide 156
Lead P/EVOs
In order to meet these responsibilities, it is critical the lead P/EVO maintain an attentive and proactive visual lead in order to detect hazards in time to warn motorists including the load movement team.
slide 157
Lead P/EVOs
Potential hazards include:
- Foreign objects in the roadway.
- Defective roadway surface.
- Other large vehicles.
- Edge drop off, potholes.
slide 158
Lead P/EVOs
- Work zones
- Collisions or disabled vehicles.
- Other large vehicles.
- Signs, overpasses.
- Railroad crossings/elevation changes.
slide 159
Rear P/EVOs
Duties of the rear P/EVO include:
- Monitoring the load and load vehicle.
- Watching to the side and rear of the load.
- Monitoring offtracking risks.
slide 160
Review Questions
slide 161
Review Questions
What is the primary skill that lead P/EVOs must develop?
What is the number one cause of injuries and death in construction work zones?
slide 162
Review Questions
What are some of the hazards about which P/EVOs need to alert the load movement team?
What are some benefits of standardizing P/EVO rules?
slide 163
Review Questions
How is stopping distance affected by speed?
What are the primary duties of P/EVOs? The lead P/EVO? Rear?
slide 164
Review Questions
What is "offtracking?"
What is a primary hazard for loads with low ground clearance?
slide 165
Module Five - Lesson Two
- Equipment use
- Flagging Equipment
- Emergency Equipment
- P/EVO special skill areas
slide 166
Equipment Deployment & Operation
Traffic Control Equipment;
For flagging traffic, P/EVOs should (or as required by the States) wear a hardhat and retro-reflective high visibility garment as required by the MUTCD Section 6D.03*.
* The FHWA has incorporated by reference the Manual on Uniform Traffic Control Devices for Streets and Highways (MUTCD, pursuant to 23 CFR 655.601(d)(2).
slide 167
Equipment Deployment & Operation
Traffic Control Equipment
Traffic control requires use of a STOP/SLOW paddle and a two-way radio to notify other members of the load movement team.
slide 168
Equipment Deployment & Operation
Traffic Control Equipment
Many States require a flashlight and safety cone. This is highly recommended for all P/EVOs, especially when moving loads at night.
slide 169
Equipment Deployment & Operation
Emergency equipment required by many States includes:
- Fire extinguishers.
- Warning devices (flares, cones, reflectors).
slide 170
Equipment Deployment & Operation
Deployment and placement of warning devices must be understood by all team members. In an emergency situation, the first obligation of the team is to warn approaching motorists of hazards.
slide 171
Special P/EVO Operations
- Height pole operations
- Tillerman duties/requirements
slide 172
Specialized P/EVO Skills - Height Pole
Height pole operation:
A height pole is required for overheight loads.
The height pole operator warns the load driver about overhead obstructions.
slide 173
Specialized P/EVO Skills - Height Pole
The height pole must be made of non-destructive, non-conductive material.
The height pole should be set 3 to 6 inches above the tallest part of the load.
slide 174
Specialized P/EVO Skills - Tillerman
A tillerman or steerman controls articulated trailers, typically involved in moving long loads.
slide 175
Specialized P/EVO Skills - Tillerman
Many States require a tillerman to have a Class A CDL.
Many States prohibit P/EVOs from simultaneously serving as the tillerman.
(See 49 CFR 383.3)
slide 176
Review Questions
slide 177
Review Questions
What size is recommended for controlling traffic in speed zones higher than 60 mph?
How tall should the pole for the STOP/SLOW paddle? Why?
slide 178
Review Questions
What equipment must flaggers wear?
What equipment is used to control traffic?
What must flaggers NOT have?
slide 179
Review Questions
Where should warning devices be placed in roadside emergency situations?
What is the function of a height pole?
What is a tillerman/steerman?
slide 180
Module Five - Lesson Three
- P/EVO positions & procedures
slide 181
P/EVO Positions and Procedures
P/EVOs:
- Warn motorists about an oversize load
- Control traffic, when allowed, and
- Assist the load driver to successfully negotiate obstructions and complete challenging maneuvers.
slide 182
P/EVO Positions and Procedures
The number of P/EVOs varies from State to State, however, permits typically indicate the number of escorts required for a specific load, and the placement (front or rear) of the P/EVOs.
slide 183
P/EVO Positions
Establishing a safe distance between the escort vehicle and the load is dependent on several factors:
- Speed of traffic.
- Traffic volume.
slide 184
P/EVO Positions
- Roadway conditions (wet or dry).
- Roadway surface (asphalt, gravel, etc.).
- Features of the terrain (curves and hills)
- Visibility.
slide 185
P/EVO Positions
In good conditions, P/EVOs should be approximately 4 seconds ahead or behind the load.
Good conditions: Flat, level, dry pavement in the daytime.
slide 186
P/EVO Positions
At least one second should be added for each hazardous condition.
Hazardous conditions: Anything that negatively affects visibility, traction, or braking.
slide 187
P/EVO Positions
For example, if it is raining, add 1 second of following distance for the visibility hazard, and 1 second for the reduction in traction from operating on a wet surface. AND . . .
slide 188
P/EVO Positions
If it has been raining for several hours, add a THIRD second for the standing water hazard that now exists.
slide 189
P/EVO Positions
The lead P/EVO must be:
- Far enough ahead of the load to be safe;
- Close enough to warn motorists of the load; and
slide 190
P/EVO Positions
- Close enough to remain in radio contact with the load driver and other P/EVOs.
- Distance must be monitored and adjusted as driving conditions change.
slide 191
P/EVO Procedures
Basic maneuvers are vastly more challenging when escorting an oversize load. These maneuvers include:
- Passing a slower vehicle.
- Changing lanes.
slide 192
P/EVO Procedures
- Merging onto multi-lane highways.
- Operating with restricted visibility.
- Turning long loads.
slide 193
P/EVO Procedures
P/EVOs must become familiar with load limitations and ways of minimizing risks when executing these maneuvers.
slide 194
Review Questions
slide 195
Review Questions
What determines the number of escorts and their placement relative to the load?
What should be considered when establishing distance between the P/EVOs and the load vehicle?
slide 196
Review Questions
What common traffic maneuvers require extra vigilance on the part of P/EVOs?
Why are many laws and rules governing P/EVOs ambiguous and non-specific?
slide 197
Module Five - Lesson Four
- Defensive flagging operations
- Equipment and use
- Traffic control authority
slide 198
Defensive Flagging
The 2009 MUTCD includes federal standards for flagging operations including equipment and methods.
slide 199
Defensive Flagging
slide 200
Defensive Flagging
slide 201
Defensive Flagging
Goals:
- To guide traffic safely around obstructions.
- To protect lives and property.
- To avoid unreasonable delays.
slide 202
Defensive Flagging
Flaggers must:
- Command attention and respect.
- Convey clear, simple messages.
- Give enough time for motorists to respond.
- Understand the importance of the job.
slide 203
Defensive Flagging
Good flaggers are:
- Serious.
- Alert.
- Courteous.
- Patient.
slide 204
Defensive Flagging
Good flaggers are:
- In good physical condition.
- Have good eyesight, mobility, and hearing.
- Neat, clean, professional appearance.
slide 205
Defensive Flagging
Flaggers need:
- Adequate number of breaks.
- Proper equipment.
- Radio.
- Water.
slide 206
Defensive Flagging
Flaggers should not (or as required by the States) have:
- Cell phones.
- Music players.
- Books.
- Food.
slide 207
Defensive Flagging
P/EVOs are sometimes needed to flag traffic in planned and unplanned situations.
State rules vary in whether or not P/EVOs are allowed to flag traffic.
slide 208
Defensive Flagging
Planned traffic control situations, for example, involve closing narrow bridges to allow the oversize load to cross, or controlling traffic when the load must encroach into oncoming traffic in order to complete a turn.
slide 209
Defensive Flagging
Unplanned traffic control situations include the unexpected—vehicle breakdowns, the load shifting, tie down failure, weather conditions, or collisions for example.
slide 210
Defensive Flagging
Given the possibility of unplanned flagging operations, P/EVOs must be prepared to flag traffic night or day, wet or dry, hot or cold, etc.
slide 211
Defensive Flagging
Even if a permit specifies daylight to dark operations, a breakdown may require P/EVOs to flag traffic until the disabled vehicle can be repaired or removed from the roadside.
slide 212
Defensive Flagging
P/EVOs should use hard hats (or as required by the States) and shall use retro-reflective high visibility garments as required by the MUTCD Section 6D.03.
P/EVOs should not (or as required by the States) attempt to control traffic from inside a vehicle.
slide 213
Defensive Flagging
It is never appropriate to attempt to stop traffic by parking a vehicle across lanes of traffic. This is exceedingly dangerous for highway users, the P/EVOs and load driver, and the vehicles.
slide 214
Defensive Flagging
Standards for flagging equipment and operations can be found in the Manual on Uniform Traffic Control Devices (MUTCD), Part 6.
slide 215
Temporary Traffic Control
slide 216
Temporary Traffic Control
Temporary Traffic Control (TTC) is the type of flagging done by P/EVOs.
TTC is particularly dangerous due in part to the fact that P/EVOs do not have the advantage of advance warning signs.
slide 217
Temporary Traffic Control
For this reason it is vital that the flagger is visible to traffic and has the ability to move in any direction should it be necessary to avoid being struck by a vehicle.
slide 218
Traffic Control Operations
Nothing should be near the flagger, including vehicles and other workers.
The flagger must be vigilant and monitor traffic conditions.
slide 219
Traffic Control Operations
Flaggers should have only the STOP/SLOW paddle and radio. Flagger should not have cell phones or music players or any other device that may distract the flagger from his/her duties.
slide 220
Traffic Control Operations
Flaggers must be given adequate breaks. The hotter, colder, or wetter the weather, the more frequent breaks should be.
slide 221
Review Questions
slide 222
Review Questions
In what situations might P/EVOs be required to control (flag) traffic?
When is it appropriate to control traffic from inside a vehicle?
What does TTC stand for? Why is it dangerous?
slide 223
Review Questions
Where are federal standards regarding flagging found?
Who or what should be near a flagger?
When is it appropriate to control traffic by parking a vehicle across lanes of traffic?
slide 224
Flagging Equipment
slide 225
Flagging Equipment
The STOP/SLOW paddle is the preferred hand signaling device—it provides clearer guidance to motorists than the red flag.
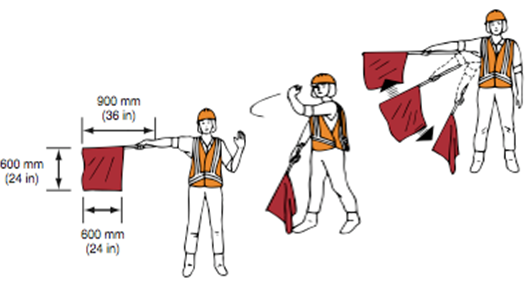
P/EVOs should carry a 24" x 24" red flag to control traffic in an emergency, for use when no STOP/SLOW paddle is available.
slide 226
Flagging Equipment
Flaggers must use the standard STOP/SLOW paddle, though States differ in the size required (18" or 24").
A 7-foot pole is recommended, as that is the height at which most stop signs are installed.
slide 227
Flagging Equipment
Flaggers must be in radio contact with other members of the load movement team, including other flaggers.
A flashlight with safety cone is strongly recommended, especially for nighttime flagging.
slide 228
Flagging Equipment
All flagging equipment should have retroreflective surfaces, including the STOP/SLOW paddle, high visibility garments, as well as adding reflective tape to poles, gloves, footwear and hardhat.
slide 229
Flagging Procedure
slide 230
Flagging Procedure
Flaggers must be located on the right side of the road where motorists are accustomed to seeing stop signs.
slide 231
Flagging Procedure
Always stop traffic from the side of the road. Once traffic is stopped, (and ONLY after traffic is stopped) the flagger may take a position near the center line to be more visible to oncoming traffic.
slide 232
Flagging Procedure
It is important for flaggers to use standardized hand signals.
slide 233
Flagging with the Stop/Slow Paddle
Use standard hand signals:
slide 234
Using a Flag to Control Traffic
Use standard hand signals:
slide 235
Review Questions
slide 236
Review Questions
Why is radio contact important for flaggers? In what situations is it most important?
Are P/EVOs authorized to control traffic in all States?
slide 237
Review Questions
With a STOP/SLOW paddle, is it necessary to use standard hand signals?
What equipment should be used when engaged in nighttime flagging?
slide 238
Flagger Position
slide 239
Traffic Control Plans
Escort should prepare a Traffic Control Plan (TCP). The four parts of a TCP are: (Remember ATAT)
- Advance warning area
- Transition area
- Activity area
- Termination area
slide 240
Flagger Position
When deciding the flagger location, consider:
- How fast traffic is moving.
- Features of the terrain.
- Type and condition of roadway surface.
slide 241
Flagger Position
Flagger location depends on:
- How fast traffic is moving.
- Hills and curves.
- Type of roadway surface.
- Condition of roadway surface.
slide 242
Flagger Position
Decision Distance
(MUTCD)
| Speed | Distance |
|---|---|
| 20 mph | 115 feet |
| 25 mph | 155 feet |
| 30 mph | 200 feet |
| 35 mph | 250 feet |
| 40 mph | 305 feet |
| 45 mph | 360 feet |
| 50 mph | 425 feet |
| 55 mph | 495 feet |
| 60 mph | 570 feet |
| 65 mph | 645 feet |
| 70 mph | 730 feet |
| 75 mph | 820 feet |
slide 243
Flagger Position
Always have an escape route in all directions.
Flagger must be far enough ahead of the problem area so that approaching traffic has time to stop.
slide 244
Flagger Position
Flagger must be clearly visible to approaching traffic in all directions.
Never stand near or between vehicles parked on the side of the road.
slide 245
Flagger Position
Ways to measure distance:
Skip line method: On highways, painted (as specified in the MUTCD) lines are 10 feet long with a gap of 30 feet, so from beginning of one line to the beginning of the next is 40 feet.
slide 246
Flagger Position
Telephone poles are about 100 feet apart.
Count steps (average is about 3 feet), or
Use a distance measuring wheel.
slide 247
Flagger Position
The most important thing to consider is whether the biggest, heaviest vehicle that may come along can stop given the specific conditions.
slide 248
Flagger Position
Stopping distance is related to:
- How much a vehicle weighs.
- How fast it is moving.
- Wet or dry surface, asphalt or gravel.
- Moving uphill or down.
- Condition of the brakes.
- Driver''s vigilance and reaction time.
slide 249
Flagger Position
And remember,
Stopping distances are DOUBLED when roadway is wet.
slide 250
Review Questions
slide 251
Review Questions
What should be considered when deciding where to place a flagger?
How big, according to the MUTCD, are typical stop signs on highways with speed limits of 60 mph or more?
slide 252
Review Questions
What does "decision distance" refer to?
What methods can be used to measure distances when positioning flaggers?
What factors affect stopping distance?
slide 253
Review Questions
How does stopping distance relate to flagger position?
slide 254
Traffic Control Authorization
All States do not authorize P/EVOs to control traffic, specifically to direct traffic to stop, slow down, or proceed.
As stressed throughout, P/EVOs must know the rules in the States in which they operate.
slide 255
Flagging DOs and DON'Ts
slide 256
Flagging DOs and DON'Ts
It is never appropriate to control traffic in an intersection where a working traffic light is in place.
Why?
slide 257
Flagging DOs and DON'Ts
Under no circumstances should a flagger stop flagging until blocked lane(s) are clear.
This is true regardless of whether the P/EVO is controlling traffic behind the load or controlling oncoming lane(s) of traffic in front.
slide 258
Flagging DOs and DON'Ts
- Be alert.
- Remain standing at all times, facing oncoming traffic.
- Park vehicles:
- off the road.
- away from the flagger station.
- Never turn or look away from oncoming traffic.
slide 259
Flagging DOs and DON'Ts
- Never stand in the path of moving traffic.
- Never stand near or between parked vehicles on the roadside.
- Flaggers must be free from distractions - (no music players, smart phones).
slide 260
Flagging DOs and DON'Ts
- No person should be near any flagger.
- Never lean on vehicles; be polite but brief.
- Never argue with a motorist.
slide 261
Flagging DOs and DON'Ts
If a motorist ignores the flagger's instructions, immediately notify workers in the activity area.
Do not stop flagging. Try to get license number and report incident when possible.
slide 262
Review Questions
slide 263
Review Questions
Why is it important for flaggers to remain standing?
Why is it important for flaggers (and others) to avoid standing near or between vehicles parked on the roadside?
slide 264
Review Questions
What three things, in SOME States, are P/EVOs authorized to direct traffic to do?
Why should other workers stay away from flaggers?
What should a flagger do if a motorist ignores the flagger's instructions?
slide 265
Module Five - Lesson Five
- Railroad crossings
- Oversize load issues
- Railroad crossing safety issues
slide 266
Railroad Crossings
Railroad crossings and other elevation changes present high risks for oversize loads with low ground clearance.
All railroad crossings should be (or as required by the States) included in the route survey, and this information should be reviewed by the team daily.
slide 267
Railroad Crossings
Emergency procedures related to loads becoming lodged at a railroad crossing should be reviewed.
A 150-car freight train takes more than a mile and a half to stop. Passenger trains are similar.
reviewed.slide 268
Railroad Crossings
The first thing to do the load becomes lodged at a railroad crossing is:
Get out of the vehicle and off the tracks.
Notify the railroad and local authorities.
slide 269
Railroad Crossings
If a collision is imminent: Move away from the tracks. Move TOWARD an oncoming train, and at the same time, AWAY from the tracks.
Many trains have hundreds of riders during peak travel times.
slide 270
Railroad Crossings
The primary problem with oversize loads and railroad crossings is low ground clearance. This problem is sometimes compounded by the length of the load.
slide 271
Railroad Crossings
The length of loads also means it takes longer to cross tracks and the load must have enough room to fully clear the tracks plus 6 feet. Nearby stop signs and lights need to be noted on the route survey.
Trains extend 6 feet beyond the tracks.
slide 272
Railroad Crossings
Railroad crossings (and any other elevation changes) should be reviewed daily when moving long loads with low ground clearance.
Railroad crossings and emergency numbers from each of them should be included on the route survey.
slide 273
Railroad Crossings
Railroad crossings may be active or passive.
Special care must be taken at passive crossings (those without gates, lights, or other active warning devices).
slide 274
Railroad Crossing Emergency
If the load stalls or hangs up at a crossing:
- Get out of the vehicle and off the tracks.
- Move away from the tracks - Toward the oncoming train and away from the tracks at a 45-degree angle.
slide 275
Railroad Crossing Emergency
- Locate the emergency phone number (from the route survey, the P/EVOs own pre-trip information, and/or at the crossing itself).
- Call for help! In addition to the railroad company, call 911 and local authorities, or request a specific person do it.
slide 276
Review Questions
slide 277
Review Questions
When escorting a load with low ground clearance, what must P/EVOs do daily?
How long does it take a train to stop? Do freight trains and passenger trains differ dramatically in stopping distance?
slide 278
Review Questions
What are two types of railroad crossings?
Where should the load stop in relation to the tracks? How does this affect where the P/EVOs should be?
What must be done if a load becomes lodged at a railroad crossing?
slide 279
Review Questions
What information about railroad crossings should be included in a route survey?
slide 280
Railroad Safety Reminders
slide 281
Railroad Safety Reminders
Never race a train to a crossing.
Remember some vehicles must come to a complete stop at railroad crossings (School and transit buses, hazmat loads, and tankers, for example).
slide 282
Railroad Safety Reminders
Look up and down the tracks.
Don't expect to hear a train with engine and cab sounds present.
slide 283
Railroad Safety Reminders
Multiple tracks require multiple checks and much more time to cross.
Beware of obstructions that may block the view of an approaching train (vegetation, buildings, standing railcars or moving trains on other tracks, for example).
slide 284
Railroad Safety Reminders
Load must be able to cross all tracks without changing gears, braking, or stopping.
Expect a train on any track at any time.
slide 285
A note about notifications
When notifications are required (often specified on permits), it is the carrier/load driver who is required to make those notifications.
slide 286
Module Five - Lesson Six
- Emergency procedures
- Traffic emergencies
- Vehicle emergencies
slide 287
Emergency Procedures
What is an emergency?
An emergency is unexpected.
An emergency threatens a population; the threat may be real or possible.
slide 288
Emergency Procedures
Emergencies demand a rapid, sometimes immediate response.
Responses made by the load movement team will either reduce or enhance an emergency. Managing risk is a key to reducing emergencies and their impacts.
slide 289
Emergency Procedures
The importance of the response to an emergency is the primary reason P/EVOs must discuss emergency responses and contingency plans with all members of the load movement team.
slide 290
Types of Emergencies
Emergencies that are most common when moving oversize loads can be categorized as:
Traffic Emergencies
or
Vehicle Emergencies
slide 291
Traffic Emergencies
When faced with a traffic emergency, drivers have two choices:
Stop before hitting a vehicle or object,
or
Steer around a vehicle or object.
slide 292
Traffic Emergencies
The importance of adequate following distance in an emergency is clear. In fact, adequate following distance is the most effective strategy a driver can use to avoid and/or minimize negative effects of both traffic and vehicle emergencies.
slide 293
Vehicle Emergencies
Vehicle emergencies include brake failure, tire failure, skids, fire, and other problems.
Always having an escape route in mind, and creating as much space as possible between vehicles reduces the impact of vehicle failures.
slide 294
Emergency Roadside Parking
It is vital that P/EVOs give adequate warning to motorists especially when in hilly or curvy terrain or during nighttime operations.
slide 295
Emergency Roadside Parking
P/EVOs must assist the load driver in getting the oversize load as far off the roadway as possible when continued movement is too hazardous.
At the same time, the P/EVO (especially the rear) must alert approaching motorists of the hazard.
slide 296
Emergency Roadside Parking
All drivers should wear hardhats (as required by the States) and shall wear high visibility garments (as required by the MUTCD Section 6D.03) during roadside operations.
All members of the load movement team should know the location of warning devices and their proper use.
slide 297
Emergency Roadside Parking
P/EVOs must assist with the immediate deployment of warning devices (reflectors, flares, cones, etc.)
All vehicles involved with the movement of the load should turn on emergency flashers.
slide 298
Emergency Roadside Parking
P/EVOs must control traffic around the disabled load or incident scene when necessary and allowed in the jurisdiction.
slide 299
Vehicle Emergencies - Fighting Fire
All P/EVOs must be familiar with the location and operation of fire extinguishers.
Avoiding fires starts with the pre-trip inspection and proper maintenance of electrical, fuel, and exhaust systems.
slide 300
Vehicle Emergencies - Fighting Fire
P/EVOs should know basic fire fighting rules, for example, as a matter of personal responsibility if not law.
Never use water on an electrical fire (can produce shock) or on a gasoline fire (water spreads flammable liquids).
slide 301
Vehicle Emergencies - Fighting Fire
If a vehicle catches fire, do NOT pull into a service station.
Turn off the engine as soon as possible and do not open the hood. If fire is in cargo area, don't open the doors.
Call 911 immediately.
slide 302
Incidents with Injuries or Fatalities
Each State has laws and rules about what motorists are required to do in incidents involving injury and/or property damage.
As we know, it is the responsibility of all drivers to know these laws and rules in each State in which they operate.
slide 303
Incidents with Injuries or Fatalities
It is also frequently the case that carriers have set procedures for dealing with emergencies and incidents. These procedures should be available to all members of the load movement team.
slide 304
Review Questions
slide 305
Review Questions
What common characteristics do emergencies have?
What two options do drivers have when confronting an obstacle in the roadway?
slide 306
Review Questions
For P/EVOs, what two types of emergencies are most common? Give examples of each.
What must P/EVOs wear during roadside operations?
slide 307
Review Questions
How do contingency plans reduce the likelihood and impacts of emergencies?
What is the best overall strategy for drivers to minimize likelihood and impacts of traffic and vehicle emergencies?
slide 308
Module Six - Lesson One
- Post-trip responsibilities
slide 309
Post-Trip Responsibilities
Given the idea that P/EVOs projects are prototypical in nature, post-trip review and evaluation are significant learning opportunities.
Of equal importance are post-trip vehicle-related responsibilities, and team-related evaluations of the trip.
slide 310
Post-Trip: Vehicle and Equipment
Once the load is delivered, the P/EVOs must remove signs and flags, and turn off and/or cover warning lights.
slide 311
Post-Trip: Vehicle and Equipment
When removing equipment, inspect it for any needed cleaning, repairs, or replacement.
slide 312
Post-Trip: Documentation & Trip Log
Once vehicle related tasks are complete, record all data for trip logs.
Vehicle mileage, date and time of delivery, names of individuals related to the delivery, exact location of the load when delivered should be recorded.
slide 313
Post-Trip: Documentation & Trip Log
Provide all required paperwork to the carrier/load driver upon delivery of the load, or as agreed.
Video and audio logs are recommended. Files should be downloaded or otherwise stored, and clearly labeled, regardless of format.
slide 314
Post-Trip: Documentation & Trip Log
Documentation of daily pre-trip meetings should be part of the trip log.
Video and audio logs are recommended. Files should be downloaded or otherwise stored, and clearly labeled, regardless of format.
slide 315
Review Questions
slide 316
Review Questions
What are recommended/required post-trip P/EVO responsibilities related to the escort vehicle and equipment?
What other tasks, in addition to those related to the escort vehicle, must be completed by the P/EVO at the end of the trip?
slide 317
Module Six - Lesson Two
- Post-trip evaluation
- Route survey evaluation
- Communication effectiveness
slide 318
Post-Trip Evaluation
As a reminder, and as a matter of safety, an open climate of information sharing is vital, and this is especially important during post-trip evaluations.
slide 319
Post-Trip Evaluation
If team members are to learn from experience, openly discussing mistakes and concerns is crucial.
Learning from the experiences and mistakes of others is also highly effective: Read and share case studies.
slide 320
Post-Trip Evaluation
Each team member should be encouraged to discuss risks, hazards, dangerous equipment or behaviors, and potential hazards that need to be addressed and understood.
slide 321
Post-Trip Evaluation
For individuals who are unwilling to speak up in a group context, they should be contacted in a one-to-one environment.
slide 322
Post-Trip Evaluation
How questions are asked is also important. Rather than "What was wrong with X?" rephrase to "How could X be better?"
slide 323
Post-Trip Evaluation
Topics to include in post-tip evaluation:
Go back to the beginning of the assignment.
- Was initial information about the load accurate?
- Was pre-trip planning adequate?
- Were risks addressed?
- Were contingency plans adequate?
slide 324
Post-Trip Evaluation
- Was the route survey adequate?
- Accurate?
- Was information provided by the carrier accurate?
- Was information provided by other P/EVOs?
slide 325
Post-Trip Evaluation
In summary, how could the assignment confirmation and pre-trip planning processes have been better?
Then turn to aspects of the actual load movement. Were hazards properly described? If an emergency occurred, was the team response adequate?
slide 326
Post-Trip Evaluation
Was communication adequate? What would improve future communication among load members?
Were nearby hazards discussed each day before departing? Were estimates of distance-per-day accurate?
slide 327
Post-Trip Evaluation
Finally, if an emergency or incident was experienced during the load movement, it is important to work hard to identify causes and contributing factors in order to avoid future incidents. Be thorough and candid in the descriptions.
slide 328
Post-Trip Evaluation
Emergencies prompt questions about the adequacy and relevance of the response, and more significantly, should focus on prevention and in communicating the information to all members of the load movement team.
slide 329
Post-Trip Evaluation
How could emergencies r problems have been avoided? What will be done differently in the future?
How could the team response be better? What would the team do differently next time? Any preventative measures to be taken?
slide 330
Post-Trip Evaluation
Sharing everything learned from incidents and accidents is vital to safe operations.
slide 331
Review Questions
slide 332
Review Questions
What information should, at a minimum, be included in a post-trip evaluation?
Which aspects of pre-trip activities should be evaluated during the trip?
Why is the post-trip evaluation so important?
slide 333
Review Questions
What aspects of communication should be evaluated?
Why is post-trip evaluation of emergency responses so important?
slide 334
Module Six - Lesson Three
- Written reports
- Trip logs
slide 335
Written Reports and Trip Logs
When doing reports, agreements should be documented, including those among
- On-the-road and support members of the team, and
- Internal and external personnel (utility companies, permitting agencies, for example).
slide 336
Written Reports and Trip Logs
Reports must include details about the dates of the trip, origin and destination information similar to the pre-trip assignment confirmation task,
However...
slide 337
Written Reports and Trip Logs
In the post-trip evaluation, he emphasis is on several aspects:
- How effectively the team responded to information gained in pre-trip planning.
slide 338
Written Reports and Trip Logs
- How well the information was communicated to all people involved.
- How well the team responded to hazards and emergency situations.
slide 339
Written Reports and Trip Logs
- How well contingency plans were understood, and how well they worked.
- How can things be better next time?
Better = Safer
slide 340
Review Questions
slide 341
Review Questions
Why are audio and video logs important to maintain? How might they be used?
What should be included in written reports? Trip logs?
slide 342
Module Seven - Driver Safety
- Driver distraction
- Drowsy driving/fatigue
- Aggression
- Safety Technologies
slide 343
Driver Distractions - Lesson One
slide 344
Distractions and Driving
Driver distraction is a form of impairment.
Studies show at least 25% of crashes now involve at least one distracted driver.
A large portion of these deaths & injuries are the direct result of cell phone use.
slide 345
Distractions and Driving
Three types of distractions contribute significantly to collisions:
Visual - Taking eyes off the road.
Physical - Taking hands off the wheel.
Mental - Taking mind off driving.
slide 346
Distractions and Driving
Studies show that whether a device is hands free or handheld, in part due to demonstrable mental distraction, driving abilities deteriorate when drivers use cell phones.
Driving IS Multitasking!
slide 347
Distractions and Driving
Talking drivers are 400% more likely to be involved in a collision.
And realize that many aspects related to talking are actually TEXTING functions (for example, dialing, scrolling and selecting contacts, etc.).
slide 348
Distractions and Driving
This distinction is important because:
Texting drivers are 2300% more likely to crash.
slide 349
Distractions and Driving
Texting is the most dangerous because it involves all three types of distractions simultaneously:
- Eyes are on the screen,
- Hands are holding and/or touching the screen or keypad, and
- Mind is engaged with reading messages, selecting options, etc.
slide 350
Review Questions
slide 351
Review Questions
What are the three types of distractions?
Are hands free devices safe to use while driving? Are they substantially different than handheld devices? Why or why not?
slide 352
Review Questions
How much more likely are talking drivers to crash, when compared to non-talking drivers?
How much more likely are texting drivers to crash?
slide 353
Review Questions
Why is texting (or dialing a phone or scanning contacts or checking email, anything that involves interacting with a screen) so much more dangerous than talking on a cell phone?
slide 354
Review Questions
What is meant by the Statement, "Driving IS multitasking?"
How can drivers avoid becoming distracted?
slide 355
Module Seven - Lesson Two
- Driver fatigue
slide 356
Driver Fatigue (Drowsy Driving)
Studies reveal that drowsy driving is as deadly as drinking and driving.
Truck drivers working for more than 8 hours are twice as likely to crash.
slide 357
Driver Fatigue (Drowsy Driving)
Drowsy driving is a major cause of fatal collisions.
Drivers who get 7 to 9 hours of sleep each day are involved in less than half as many crashes.
slide 358
Driver Fatigue (Drowsy Driving)
Fatigue negatively affects skills vital for driving.
Drowsy drivers are less attentive, have slower reaction times, and are unable to make decisions as quickly as non-fatigued drivers.
slide 359
Driver Fatigue (Drowsy Driving)
In addition to lack of sleep overall, driver alertness and performance are also highly related to the time-of-day rather than how long a person has been driving.
slide 360
Driver Fatigue (Drowsy Driving
Studies also show that drivers are not able to assess accurately their own levels of alertness.
slide 361
Driver Fatigue (Drowsy Driving)
After about 17 hours of being awake, people begin to experience "micro-sleeps"—brief lapses that can last for several seconds.
At 50 mph, during a 4-second lapse, the vehicle moves 300 feet.
slide 362
Driver Fatigue (Drowsy Driving)
Tests show fatigued drivers operate as poorly as those who have been drinking alcohol. After 18 hours of being awake, drivers perform equal to or worse than drivers with a Blood Alcohol Content of .05%
slide 363
Avoiding Drowsy Driving
P/EVOs must have the courage to speak up and stop driving when fatigue is present.
Drivers too frequently continue driving when drowsy, and the consequences are very similar to those involving drinking drivers.
slide 364
Avoiding Drowsy Driving
Plan for rest just as drivers plan for food and fuel stops.
Take breaks that involve physical activity.
When a driver is sleepy, there is one solution: SLEEP.
slide 365
Review Questions
slide 366
Review Questions
How does getting 7 to 9 hours of sleep each day affect a driver's chance of being in a crash?
How does fatigue (also called "drowsy driving") affect driving skills?
slide 367
Review Questions
How does time of day affect driver alertness?
What are "micro-sleeps?"
What should drivers do to avoid fatigue?
slide 368
Review Questions
How do fatigued drivers and drinking drivers compare in terms of driving skill?
slide 369
Module Seven - Lesson Three
- Aggressive driving
slide 370
Aggression and Driving
Aggressive driving occurs:
When drivers commit a combination of moving traffic offenses so as to endanger other persons or property.
slide 371
Aggression and Driving
Road rage, on the other hand, is:
A criminal offense, an assault with a motor vehicle or other dangerous weapon by a driver or passenger(s) often related to an incident that occurred on a roadway.
slide 372
Aggression and Driving
If the load movement team encounters an aggressive driver, make every attempt to get out of the way.
Do not challenge or make eye contact with an aggressive driver. Do not attempt to restrict the aggressive driver.
slide 373
Aggression and Driving
To reduce frustration, leave with enough lead time to get to destination as planned in spite of traffic congestion or inclement weather, for example.
When possible, travel during non-peak traffic times.
slide 374
Review Questions
slide 375
Review Questions
What are the differences between aggressive driving and road rage?
Describe some behaviors exhibited by aggressive drivers.
slide 376
Review Questions
What should P/EVOs do if confronted by an aggressive driver or witnesses an incident of road rage?
What can P/EVOs do to reduce their own frustration?
slide 377
Module Seven - Lesson Four
- Safe driving practices
slide 378
Driver Safety
One of the most important aspects of safe driving involves drivers responding adequately to roadway and traffic conditions.
For P/EVOs, keeping the oversize vehicle limitations in mind is also of critical importance.
slide 379
Driver Safety
The term "good conditions" refers to flat, level, dry, pavement in the daytime. Drivers don't encounter these conditions very often.
slide 380
Driver Safety
"Hazardous conditions" refers to anything that negatively affects visibility, traction, or braking.
Accurately matching conditions with reduced speed and increased following distance enhances safety considerably.
slide 381
Driver Safety
Drivers (including P/EVOs) should use headlights at all times. This has particular benefits to individuals with gray, silver, or blue vehicles, as these colors blend into the horizon and/or pavement much more readily.
slide 382
Driver Safety
Many States require P/EVOs use headlights at all times while actively escorting loads.
slide 383
Driver Safety
When approaching other vehicles at night, from the front or the rear, drivers should not use high beams within 500 feet of other vehicles.
This reduces the condition known as "glare blindness."
slide 384
Driver Safety
Regardless of he challenges drivers face, (darkness, extreme weather, traffic volume, mountains and curves, and other hazardous conditions, adjusting space to accommodate stopping distances is a primary way to avoid collisions.
slide 385
Driver Safety
As conditions become more challenging, establishing a safe following distance is crucial. This is as important as any other strategy when preventing roadway incidents.
slide 386
Driver Safety
Perception distance +
Reaction distance +
Braking distance = Stopping Distance
slide 387
Review Questions
slide 388
Review Questions
What is meant by the term "hazardous conditions?" What about "good conditions?"
Drivers should dim lights (fro high beam to low beam) within _____ feet of oncoming vehicles or when approaching vehicles from behind.
slide 389
Review Questions
When should headlights be used?
Stopping Distance is the sum of what three distances?
Why does speed matter?
slide 390
Review Questions
How do wet roads affect stopping distance?
slide 391
Module Seven - Lesson Five
- Safety technologies
slide 392
Safety Technologies
While no technology replaces a vigilant driver, several new developments in vehicle safety have the potential to significantly reduce collisions.
slide 393
Safety Technologies
Technologies such as side view assist, forward collision warning/mitigation, lane departure warning systems and electronic stability control are examples.
slide 394
Safety Technologies
Other technologies such as adaptive headlights, under-ride guards, and blind spot monitoring and detection are particularly useful for oversize load vehicles.
Electronic logs may reduce driver fatigue.
slide 395
Safety Technologies
One drawback about safety technologies is, when a driver has adapted to the technology, and then drives a vehicle that does not have the technology, the driver must adapt quickly.
slide 396
Review Questions
slide 397
Review Questions
What are the benefits of crash avoidance technologies? Drawbacks?
Describe other safety technologies.
What are the benefits of electronic log books?
slide 398
Module Eight
- Course review
- Certification test
- Course evaluation
slide 399
Course and Test Review
Review questions can be compiled here if a comprehensive course review is desired.
Participants should be encouraged to complete and submit a course evaluation.